You are using an out of date browser. It may not display this or other websites correctly.
You should upgrade or use an alternative browser.
You should upgrade or use an alternative browser.
Small but satisfting job
- Thread starter MAF260
- Start date
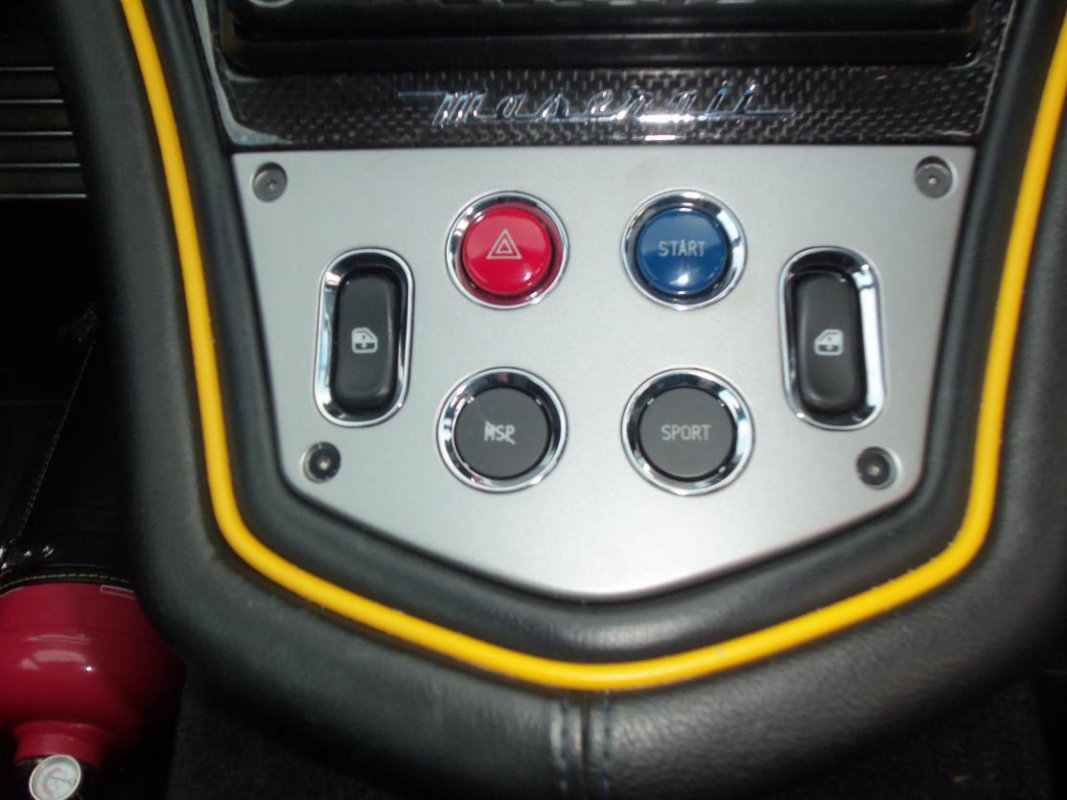
Well spotted! I suppose the buttons were configured for the LHD market, putting the Start button closest to the driver. It's always bugged me that I had to reach across a whole three inches further to start the car, so I swapped everything over. I rarely use the hazard lights and will only ever turn the traction control off under very controlled conditions. The cleaning was a bonus from my minor OCD!Re-sequenced the buttons & nicely detailled them?
adam01
Member
- Messages
- 1,079
I take it it was simple to do?
Unscrew the 4 fixings, lift out and swap?
Remember if the buttons are pealing you can buy the coating in aerosol and restore.
Matt, thats appealing
mjheathcote
Centenary Club
- Messages
- 9,046
Small but satisfying job
I should have done a 'how to' - undo the 4 hex head bolts to remove the aluminium panel. The 4 switches are located in a square plastic holder which attaches to the aluminium panel with 5 screws - undo these to free the panel. Next, remove the connectors to each switch (remember which goes where) and unclip each switch from the plastic panel. Remove the chrome bezel for each switch as they are sided and swap them over. Clip the switches back into the plastic holder and screw this back to the aluminium panel. Cleaning all of the parts and scraping the remains of the sticky surface from the switches is optional!
I take it it was simple to do?
Unscrew the 4 fixings, lift out and swap?
Remember if the buttons are pealing you can buy the coating in aerosol and restore.
I should have done a 'how to' - undo the 4 hex head bolts to remove the aluminium panel. The 4 switches are located in a square plastic holder which attaches to the aluminium panel with 5 screws - undo these to free the panel. Next, remove the connectors to each switch (remember which goes where) and unclip each switch from the plastic panel. Remove the chrome bezel for each switch as they are sided and swap them over. Clip the switches back into the plastic holder and screw this back to the aluminium panel. Cleaning all of the parts and scraping the remains of the sticky surface from the switches is optional!
Last edited:
JimBlob
Member
- Messages
- 124
Forward 10 years later…Small but satisfying job
I should have done a 'how to' - undo the 4 hex head bolts to remove the aluminium panel. The 4 switches are located in a square plastic holder which attaches to the aluminium panel with 5 screws - undo these to free the panel. Next, remove the connectors to each switch (remember which goes where) and unclip each switch from the plastic panel. Remove the chrome bezel for each switch as they are sided and swap them over. Clip the switches back into the plastic holder and screw this back to the aluminium panel. Cleaning all of the parts and scraping the remains of the sticky surface from the switches is optional!
Thanks for that, I too have been miffed overreaching for the start button and had a go today… but on removal of the panel I wasnt quite sure how to do it & found this after only 30mins of searching
Thanks!


