Rear console panel with fake leather

Danny

Member
Messages
445
Has anyone ever tried to remove the rear console panel of the Quattroporte? The corners of mine are damaged due to kids not paying attention and I would like to cover this panel with colour matched leather instead of the current (weak) fake leather.

I already removed the full ashtray but now I don't know how to proceed.

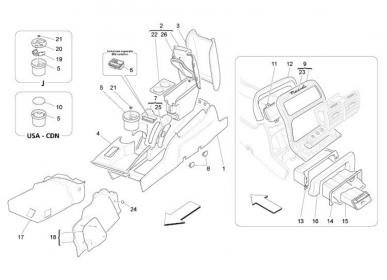
The following pic (which I borrowed from the internet) shows the panel I am referring to. See bottom of the pic:

picture.php
 

Andyk

Member
Messages
61,350
Not sure but must be a weak spot as I say a QP a few weeks ago with damage on the fake leather...
 

Emtee

New Member
Messages
8,446
This is an exploded view. I suspect the fixing screws will be hidden behind the ashtray / ashtray container?...

164_137.jpg
 

ENZ525

Member
Messages
6,748
I have not tried to remove the rear console panel, so do not know the answer to your question Danny,
I have just looked through the Maserati workshop manual for a MY06 QP, it does not describe how to remove this part...
it only shows/describes how to remove the whole centre console (start by removing the 2 front seats!!).
What I would like to add is that a lot of the fixings inside a QP (like the doors for instance) are push fit,
in other words, they simply pull of (and this gives access to hidden screws), (this I have done myself),
so if you have the ashtray removed and there are definately no screws behind, it MAY be worth trying to prize this off
taking due care of course...Please, Please do not attempt this if you are in any doubt.
I know that when I started tugging at the door trim I certainly had second thoughts..
 

Danny

Member
Messages
445
Thanks for the replies. It is indeed part nr 16 which I would like to remove. I already removed 14 and 15. I will try to prize it off first, following Enzo's advice, and if that doesn't work, I will start from the top down (pulling out vents and then remove 9, 11 and 12).
 

conaero

Forum Owner
Messages
34,670
Pretty sure it will be a push fitting, have a gentle dig around with a flat blade screw driver.

You might also have to remove part 13 and then undo the fixing from behind but from the parts diagram, it would appear that you have to remove the part you are after and then unscrew part 13.

When you do work it out, can you take some pics and do a how to write up?

Also, if you order the new part, you will be able to see the rear and that might shed light on how it comes off.
 

Danny

Member
Messages
445
I gave it another try this weekend but I didn't manage to remove part nr. 16. It seems to be stuck together with part nr 13 and I tried squeezing it, bending, digging but it won't come off. I got the impression that using too much force would hugely increase the risk of something snapping, so in the end I just gave up (with a very unsatisfactory feeling...)
 

Simon

New Member
Messages
617
My car had that problem , wear on the corners of the console. The main dealer fixed it before sale, they had some guy retouch it/repair it in situ.
 

CharlesQPV

New Member
Messages
2
Old thread, but still a problem.

If you removed the outer frame 9 successfully,

which means:

Pull out air vents and 4 screws.

First: two 3mm allen screws on bottom left right

27610977tz.jpg


the other both are hidden behind part 11

Take a look with an iPhone up and there you are. :)

after removing:

27611001rb.jpg


than next 4 screws.

Remove part 14 with ashtray...2 x 2,5 mm allen screws

27608727go.jpg


than remove 13 with 2 x 3mm allen screws:

27608728gs.jpg


The leather frame 16 is attached to 13 and to 9 with more screws.

27608824jz.jpg


simple and clean uninstall.