You are using an out of date browser. It may not display this or other websites correctly.
You should upgrade or use an alternative browser.
You should upgrade or use an alternative browser.
GranSport Giallo Granturismo thread
- Thread starter gotcha
- Start date
gotcha
Member
- Messages
- 78
Thanks guys.
I am posting a lot now as I am still going over the pictures and jobs I did over the last 2 months, but soon I will catch up to current status and slow down
As I mentioned in the beginning, my rear tyres were OK-ish with thread, but they were coming from 2011. In the front I have 2020 Michelins and these are fine but I replaced the rear ones. In current situation with rising prices and decreasing availability of anything, if I exclude Chinese brands I could decide only between Conti and Pirelli. Nothing else was available here in the GS size. And I personally don´t like Continental (I understand they are great tyres, I just irrationally don´t like the brand) I went with Pirellis. And taking 2 wheels to my friends workshop to replace tyres, I took all 4 to have them re-balanced as well. And clean all properly.
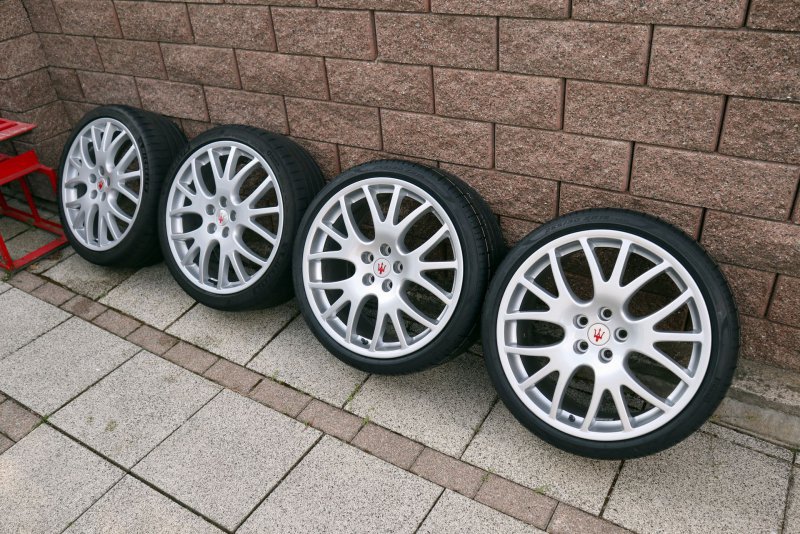
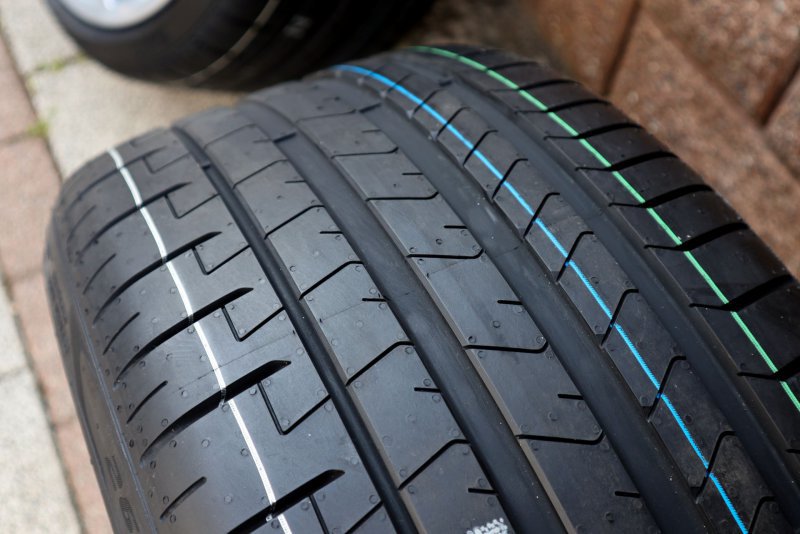
Removing the tyres and having a good look, I found out the rims were resprayed. And sprayed with tyres on, just masking tyres and spraying rim faces. There is a lip and light paint peel where rim meets the tyres. No big deal, the job is nice and maybe over the next winter I am thinking to do the job properly and spray them inside-out in Grigio Mercury that I like on yellow GS more. More importantly I checked if they are straight and indeed they are. 2 wheels have a small hit, but nothing really bad and will be straitened in the future if I respray them.
The cabin filter was probably the last filter to replace.
It is hiding under the black cover under the windshield. The most difficult part is to remove the wipers, that´s usual pain and you need a puller to do so, but the rest is easy.
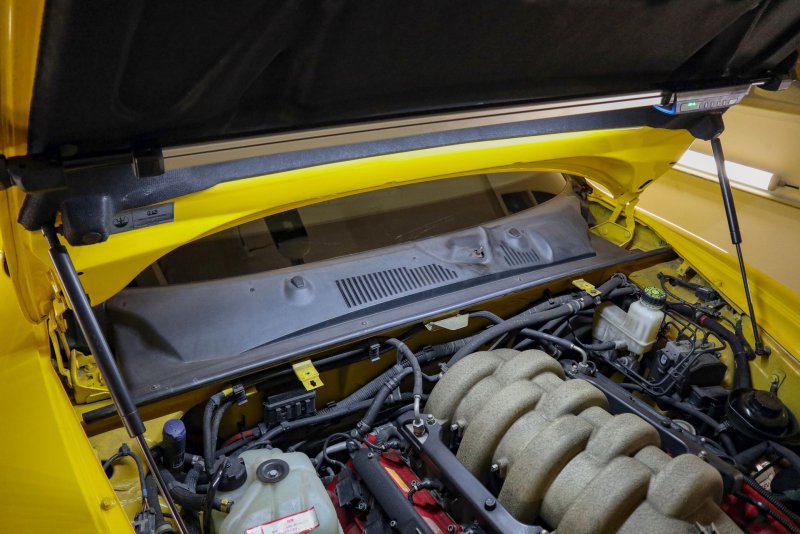
I was welcomed with a pretty dirty area full of leaves and dirt:
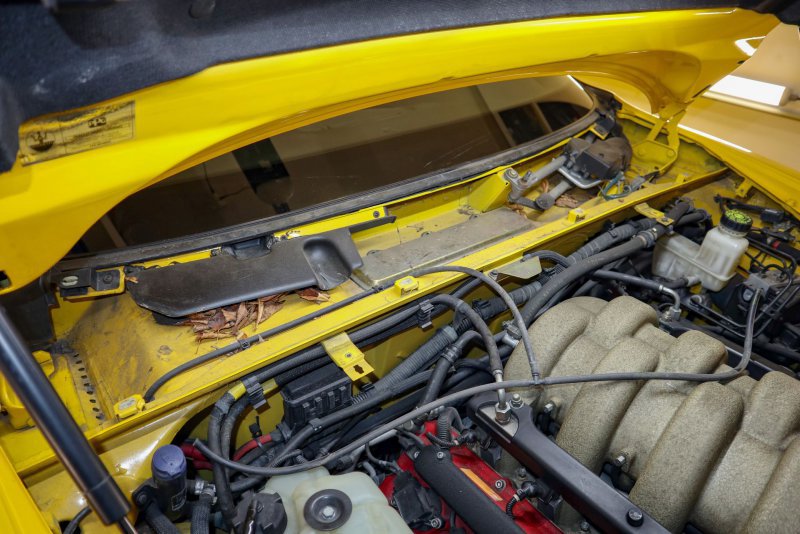
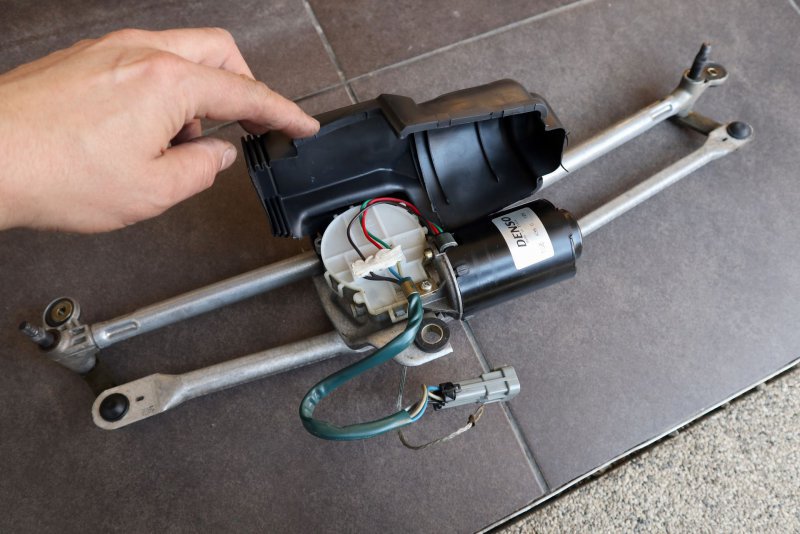
The black plastic over the air intake where you see a lot of leaves is actually glued on. Maybe it was leaking, I don´t know but somebody put a lot of black body glue to put it on. Structural glue, very difficult to remove, like windshield glue. I think if I ever really need to remove it, it will for sure break. So I only vacuumed all loose bits as good as I could and spend a over a good hour to clean all the area. I removed the wiper mechanism as well to make room and to clean that one as well:
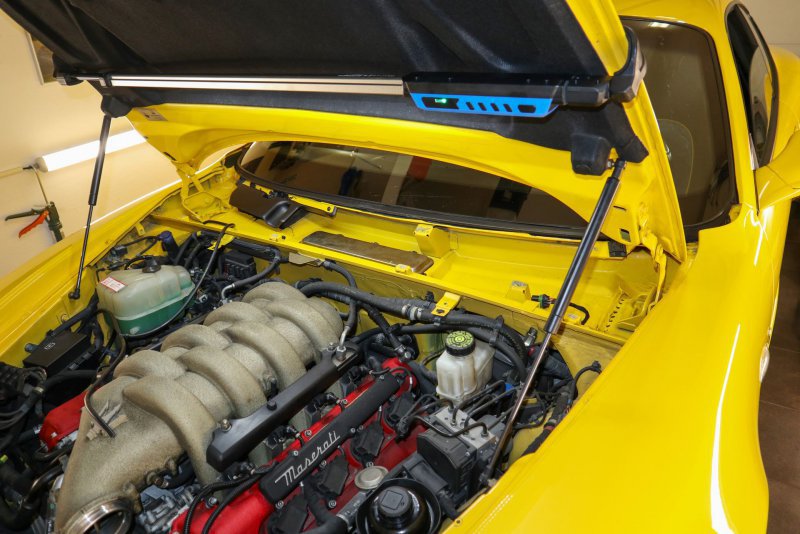
Filter itself hides under the steel cover in the middle and just pulls out after removing the cover:
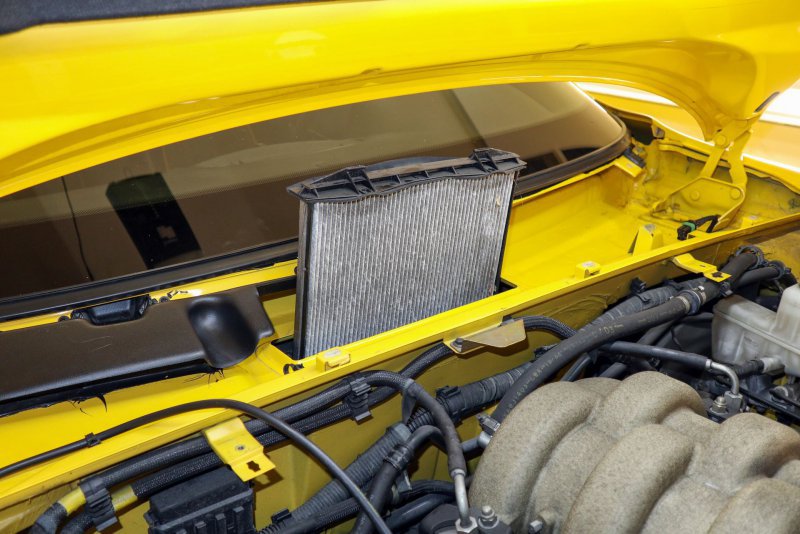
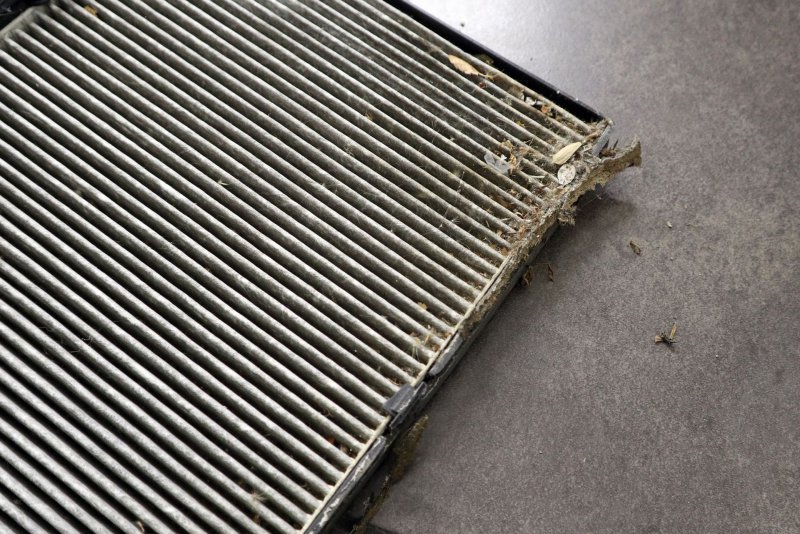
For the first replacement I bought OEM filter including the plastic frame as I didn't know what condition to expect, but I understand the filter is identical with Alfa 166 and you can replace only the paper filter inside of the frame.
Filter was pretty dirty, but not a disaster, I have seen worse on used cars:
Cleaned and assembled back:
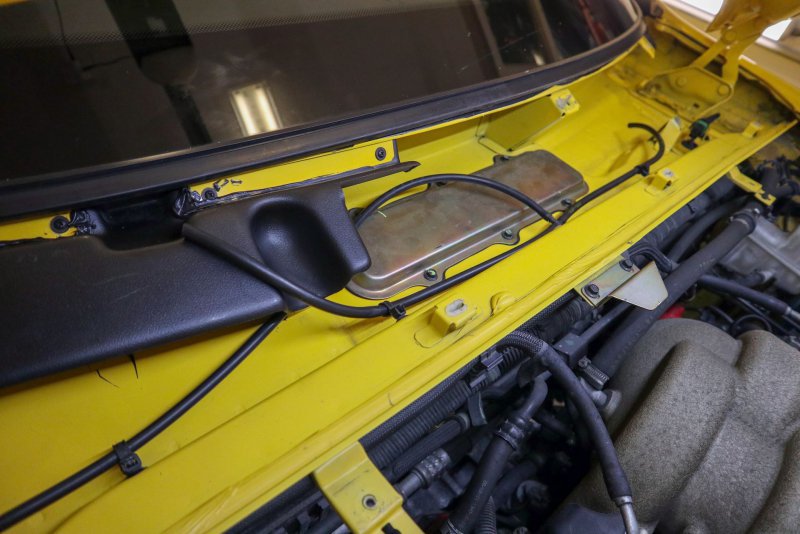
I did clean and grease the wiper mechanism as well
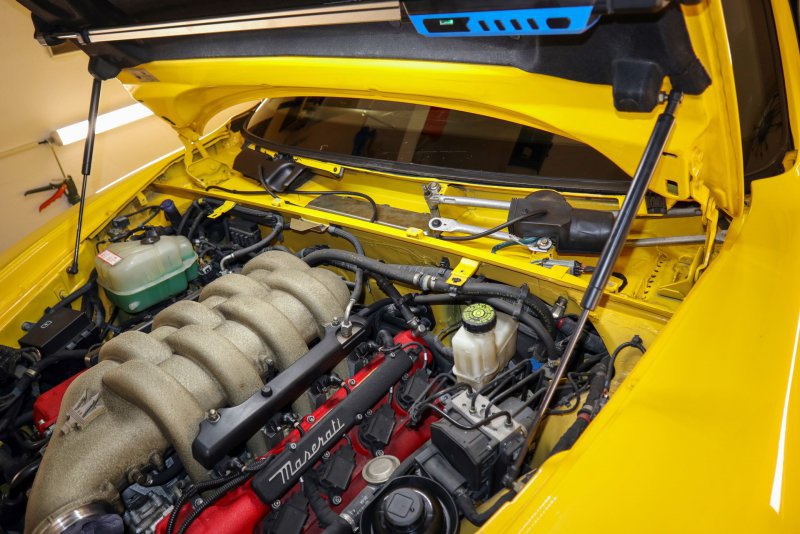
And job done, except the final cover. As that one was really faded and more grey than black, I later restored it with ceramic coat. Came out nicely, but I don´t have a picture. Anyway, treating some small stonechips, paint clay, full car polish and ceramic coat is on the to-do list for the next 2 months.
I am posting a lot now as I am still going over the pictures and jobs I did over the last 2 months, but soon I will catch up to current status and slow down
As I mentioned in the beginning, my rear tyres were OK-ish with thread, but they were coming from 2011. In the front I have 2020 Michelins and these are fine but I replaced the rear ones. In current situation with rising prices and decreasing availability of anything, if I exclude Chinese brands I could decide only between Conti and Pirelli. Nothing else was available here in the GS size. And I personally don´t like Continental (I understand they are great tyres, I just irrationally don´t like the brand) I went with Pirellis. And taking 2 wheels to my friends workshop to replace tyres, I took all 4 to have them re-balanced as well. And clean all properly.


Removing the tyres and having a good look, I found out the rims were resprayed. And sprayed with tyres on, just masking tyres and spraying rim faces. There is a lip and light paint peel where rim meets the tyres. No big deal, the job is nice and maybe over the next winter I am thinking to do the job properly and spray them inside-out in Grigio Mercury that I like on yellow GS more. More importantly I checked if they are straight and indeed they are. 2 wheels have a small hit, but nothing really bad and will be straitened in the future if I respray them.
The cabin filter was probably the last filter to replace.
It is hiding under the black cover under the windshield. The most difficult part is to remove the wipers, that´s usual pain and you need a puller to do so, but the rest is easy.

I was welcomed with a pretty dirty area full of leaves and dirt:

The black plastic over the air intake where you see a lot of leaves is actually glued on. Maybe it was leaking, I don´t know but somebody put a lot of black body glue to put it on. Structural glue, very difficult to remove, like windshield glue. I think if I ever really need to remove it, it will for sure break. So I only vacuumed all loose bits as good as I could and spend a over a good hour to clean all the area. I removed the wiper mechanism as well to make room and to clean that one as well:

Filter itself hides under the steel cover in the middle and just pulls out after removing the cover:

For the first replacement I bought OEM filter including the plastic frame as I didn't know what condition to expect, but I understand the filter is identical with Alfa 166 and you can replace only the paper filter inside of the frame.
Filter was pretty dirty, but not a disaster, I have seen worse on used cars:

Cleaned and assembled back:

I did clean and grease the wiper mechanism as well

And job done, except the final cover. As that one was really faded and more grey than black, I later restored it with ceramic coat. Came out nicely, but I don´t have a picture. Anyway, treating some small stonechips, paint clay, full car polish and ceramic coat is on the to-do list for the next 2 months.

gotcha
Member
- Messages
- 78
Today I went to friends workshop for wheel alignment and AC recharge.
I spent few days researching the correct alignment spec for GS, not the easiest info to get.
In summary, I wanted to align only the front tracking as for camber adjustment I don´t have the shims available (yet). And after replacing the steering rack and having tracking done by eye only this was the most important topic.
If the data I found are correct, than Coupe is set at the front to toe-in, but GS is set to toe-out. I found data that it should be in the -0°14´ to -0°18´ toe-out per side range or about -0°30´ total toe-out.
Mine was set to about 0°30´ toe-in per side what is pretty good considering I did it only by eye when installing the track rods and track rod ends. I did set it now on the lower end of the recommended toe-out range, about -0°14´ per side.
The front camber is supposed to be -0°30´ or put differently -0,5°. Mine is a bit asymmetrical. On the left wheel I have a bit too much -0° 47´ and on the right side I do have too little -0°14´ So I need to get some shims for the upper arms. On the right wheel I see about 2mm shim, so there should be space to increase camber and on the left I need to add a bit.
Did anybody play with it and has experience how much effect does 0,5mm or 1mm shim have on camber change? If yes, thanks for advice.
At the rear I have not touched anything. The recommended range is same values as in the front, just positive, so toe-in of +0°14´ to +0°18´ and my car was in this range.
Same as front, I have a gap in the rear camber. The recommended range is -1°36´ to -1°48´ And I have -1°27´ left and -1°11´ right. So I need some shims under the bottom rear arms anchors to push them out a bit and increase the rear camber, especially on the right.
All together, I am quite pleased with the results. The geometry is in range or close now. I can play with up to perfection a bit later. Ideally after corner balancing the car, only issue is to get the corner weights here what is close to impossible.
Another job was to have a look at the A/C. And the system was empty indeed. Or almost empty. We pulled out only 70g of the gas. On the positive side, it passed the vacuum test so at least I know there is no major leak. There can still be some tiny tiny leak and the gas will leak out over the next weeks/months, but only time will tell. We recharged the recommended 750g of gas as the A/C started to work. I would not rate it as perfect A/C, felt like my old Alfa 159 that was not the best one, but it works! At 22 degrees outside temperature I was able to measure 12 degrees air coming out of the interior vents. I had it on while still connected the the machine and seems to works fine. About 10-13bar on the HP side and 1bar on the LP side when running on the full power (temp set to LO). So for the moment I will hope for the best that the system was empty due to the car almost not being used during the last years and lets see if it still works later.
gotcha
Member
- Messages
- 78
And I continued with some interior works this time.
Since the very beginning, I wanted to remove the Pioneer head-unit the car cam with. I bit too "disco" for the car. I did get also the original Becker infotainment from the seller but I was hesitating to use it. Mainly due to lack of Bluetooth handsfree. So I searched for a more modern Becker unit on eBay I I found a nice Cascade Pro satnav unit in Romania that I got. It included also HF microphone and GPS antenna I wanted to install as well.
In parallel I realized that Maserati being a company "on budget" does not have really versions of wiring looms. On modern over-complicated Germans the wiring looms typically reflect only the equipment installed in the factory. On the GS there is only one loom with all the connectors for all possible equipment so I am finding some unused connectors. I have this experience from some Alfas as well. So for example I do have in the boot connector for parking sensors that I will retrofit later and I was pretty sure to have somewhere by roof-light a connector for dimming rear mirror. I don´t think it was a GS option, but Coupe did have it and I found it cheaply for only 50€ at one breaker so I decided to retrofit it together with HF microphone.
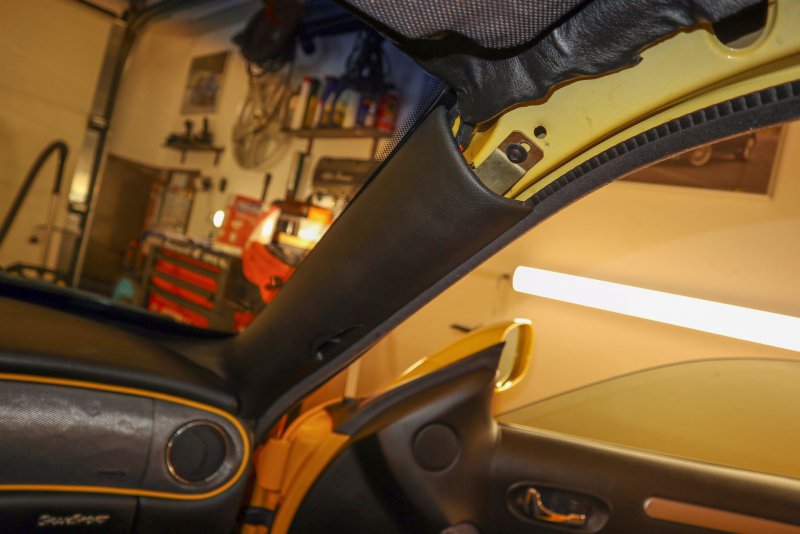
I started with removal of the trim above the doors. This reveals a screw to remove the A pillar trim:
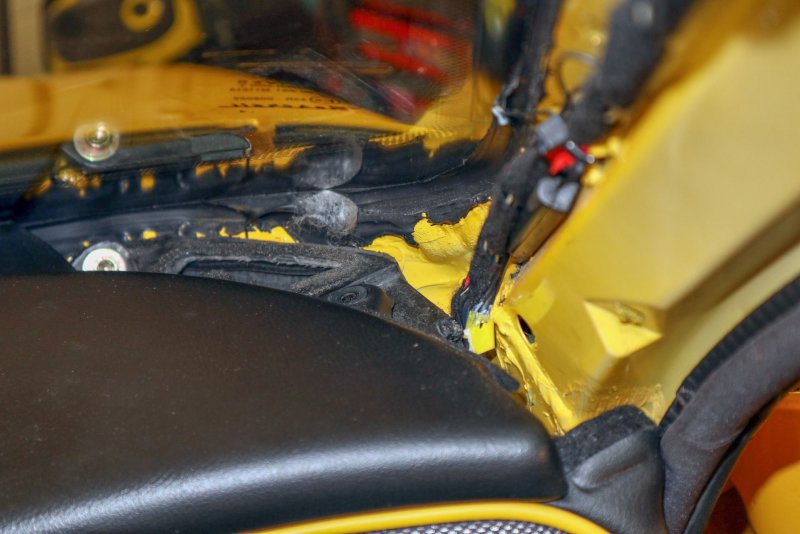
Removing A pillar trim reveals a screw holding the upper part of the dash. On this picture it is already removed, the black hole in the middle of the image:
Central dash vent is held by two screws in the front and two clips at the back. Removing it reveals another two screws holding the dash cover:
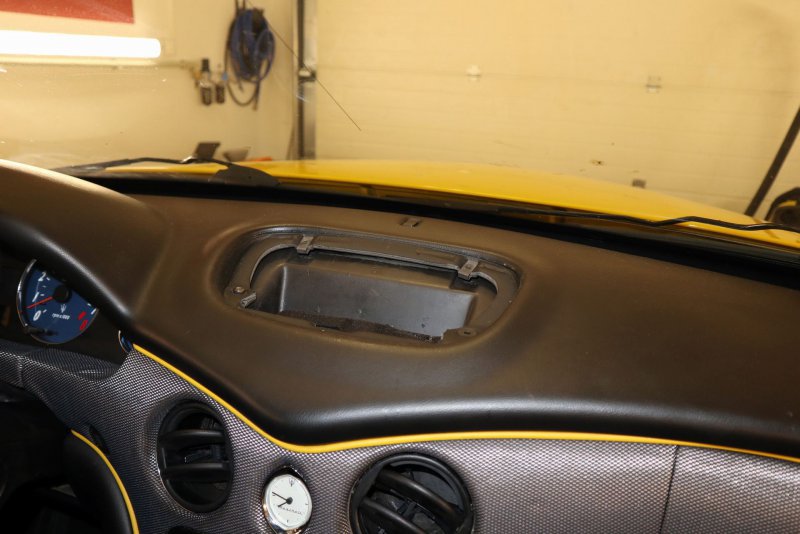
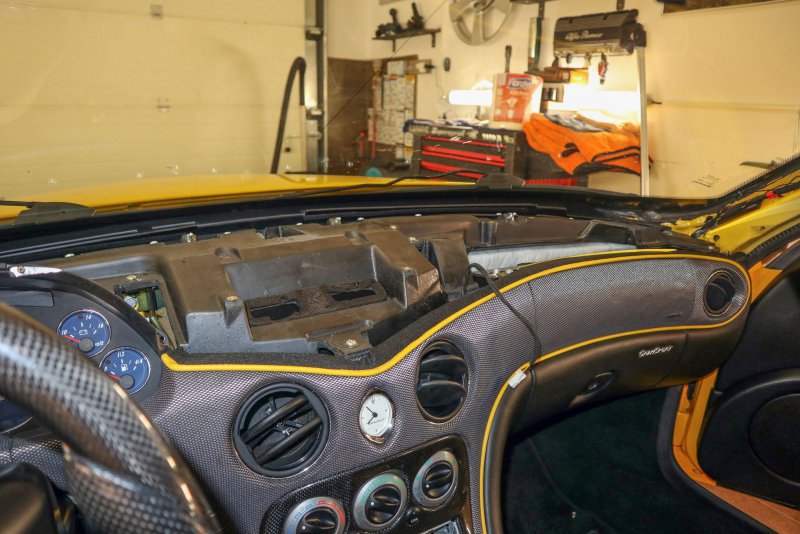
Dash cover pulls out towards the back, it is held by some locating pins in its front part and needs to slide off them:
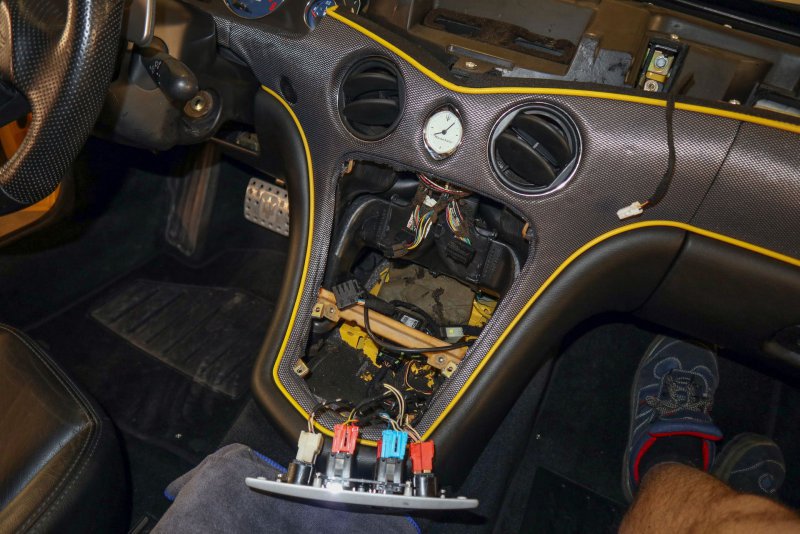
I continued with the center console, just 4 screws. And they do reveal 2 screws that hold the bottom of the carbon trim around radio and A/C.
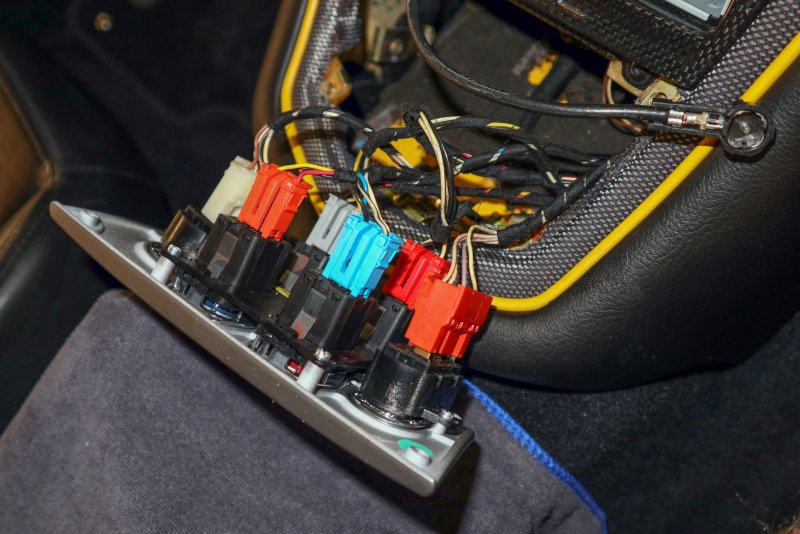
The carbon panel pulls out from its clips at the top:
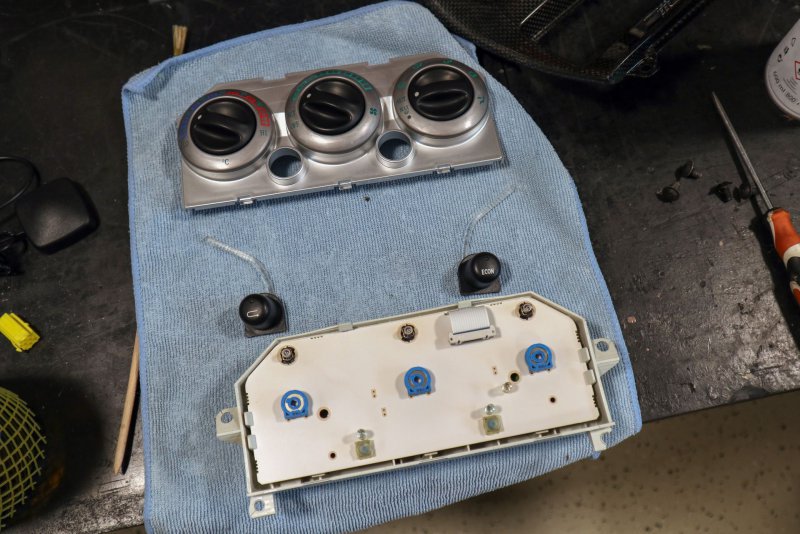
As I was already there, I also disassembled the AC unit. with a painting brush and isopropylacohol I cleaned the sticky surface off the knobs and buttons and blew all dirt with compressed air:
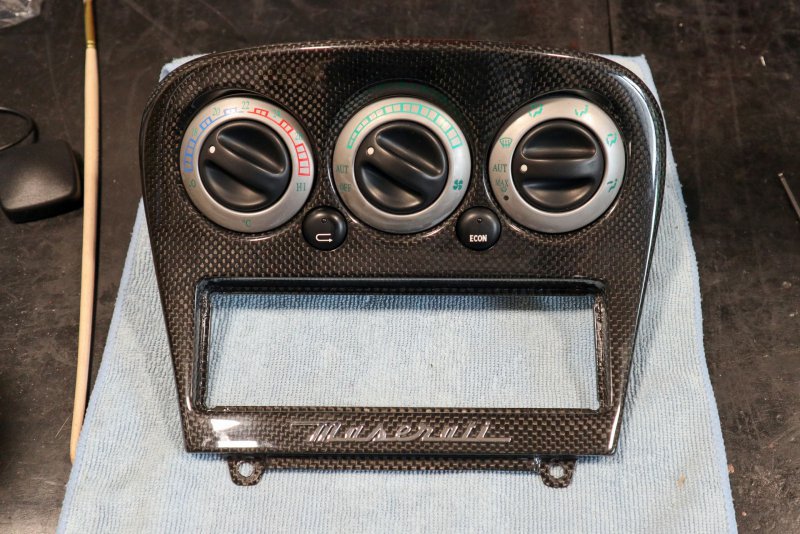
Looks as good as new after assembly:
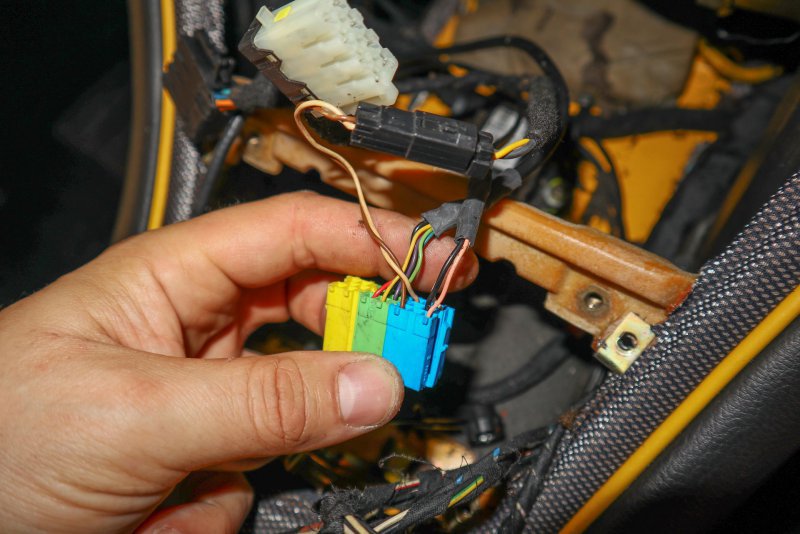
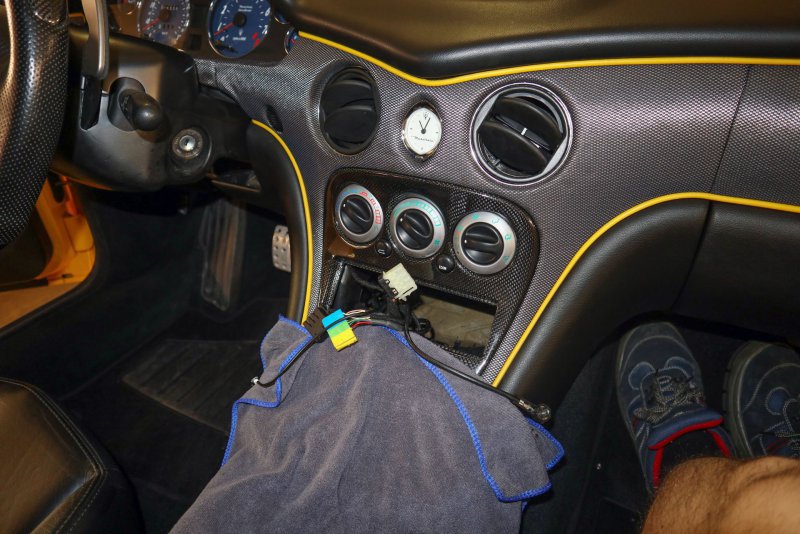
Following the topic of wiring, here is another bit. Even thought GS never had factory handsfree, the loom includes microphone wiring. The blue connectors has two wires on the left, dark and light brown. They attached to that black connector and follow as yellow and black wires further. They also end behind ceiling light and in Coupe they connect to the microphone of the connect unit:
Being already there I did find also the wiring for dimming mirror. It was in a thick plastic sleeve, so I cut it off and wrapped the wires in textile tape:
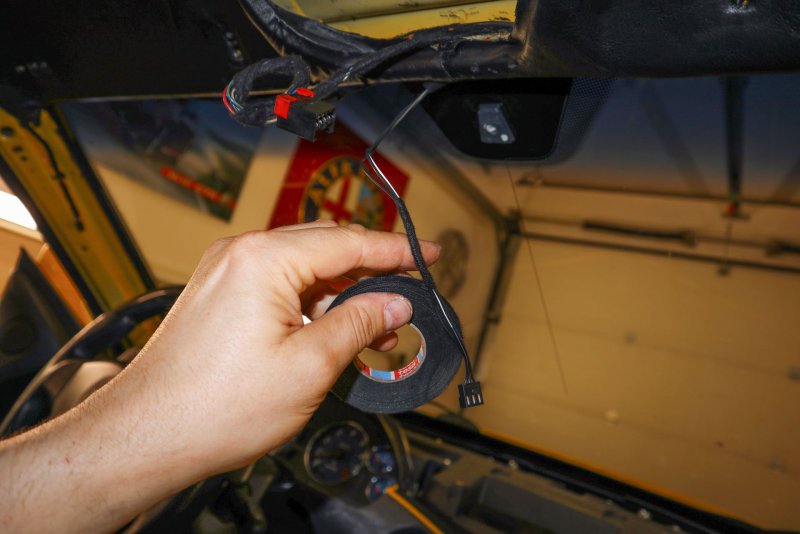
In the end, dimming mirror is not difficult to install to any car. They are usually connected with 3 wires. Ground, 12V and reverse signal not to dim the mirror when in reverse (12V pin when reverse gear is inserted). So they can be installed into vehicles that are not pre-wired easily as well.
Since the very beginning, I wanted to remove the Pioneer head-unit the car cam with. I bit too "disco" for the car. I did get also the original Becker infotainment from the seller but I was hesitating to use it. Mainly due to lack of Bluetooth handsfree. So I searched for a more modern Becker unit on eBay I I found a nice Cascade Pro satnav unit in Romania that I got. It included also HF microphone and GPS antenna I wanted to install as well.
In parallel I realized that Maserati being a company "on budget" does not have really versions of wiring looms. On modern over-complicated Germans the wiring looms typically reflect only the equipment installed in the factory. On the GS there is only one loom with all the connectors for all possible equipment so I am finding some unused connectors. I have this experience from some Alfas as well. So for example I do have in the boot connector for parking sensors that I will retrofit later and I was pretty sure to have somewhere by roof-light a connector for dimming rear mirror. I don´t think it was a GS option, but Coupe did have it and I found it cheaply for only 50€ at one breaker so I decided to retrofit it together with HF microphone.
I started with removal of the trim above the doors. This reveals a screw to remove the A pillar trim:

Removing A pillar trim reveals a screw holding the upper part of the dash. On this picture it is already removed, the black hole in the middle of the image:

Central dash vent is held by two screws in the front and two clips at the back. Removing it reveals another two screws holding the dash cover:

Dash cover pulls out towards the back, it is held by some locating pins in its front part and needs to slide off them:

I continued with the center console, just 4 screws. And they do reveal 2 screws that hold the bottom of the carbon trim around radio and A/C.

The carbon panel pulls out from its clips at the top:

As I was already there, I also disassembled the AC unit. with a painting brush and isopropylacohol I cleaned the sticky surface off the knobs and buttons and blew all dirt with compressed air:

Looks as good as new after assembly:

Following the topic of wiring, here is another bit. Even thought GS never had factory handsfree, the loom includes microphone wiring. The blue connectors has two wires on the left, dark and light brown. They attached to that black connector and follow as yellow and black wires further. They also end behind ceiling light and in Coupe they connect to the microphone of the connect unit:

Being already there I did find also the wiring for dimming mirror. It was in a thick plastic sleeve, so I cut it off and wrapped the wires in textile tape:

In the end, dimming mirror is not difficult to install to any car. They are usually connected with 3 wires. Ground, 12V and reverse signal not to dim the mirror when in reverse (12V pin when reverse gear is inserted). So they can be installed into vehicles that are not pre-wired easily as well.
gotcha
Member
- Messages
- 78
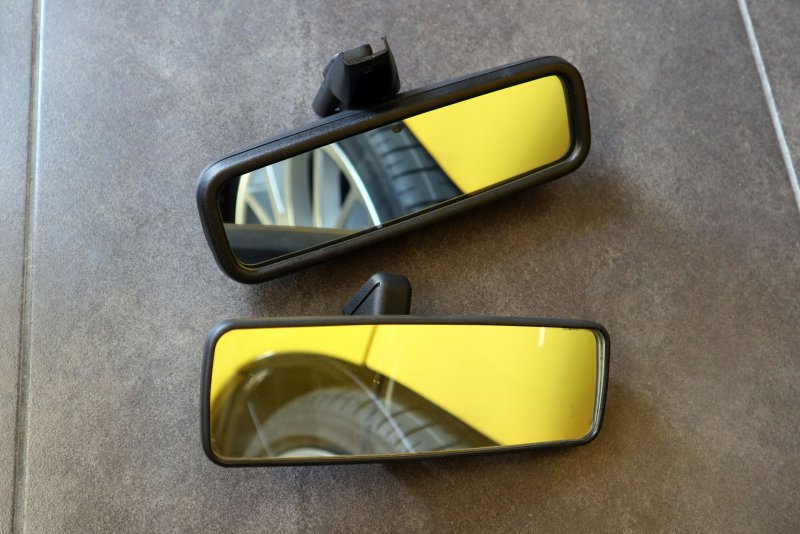
Here are the GS mirror and Coupe dimming one on top:
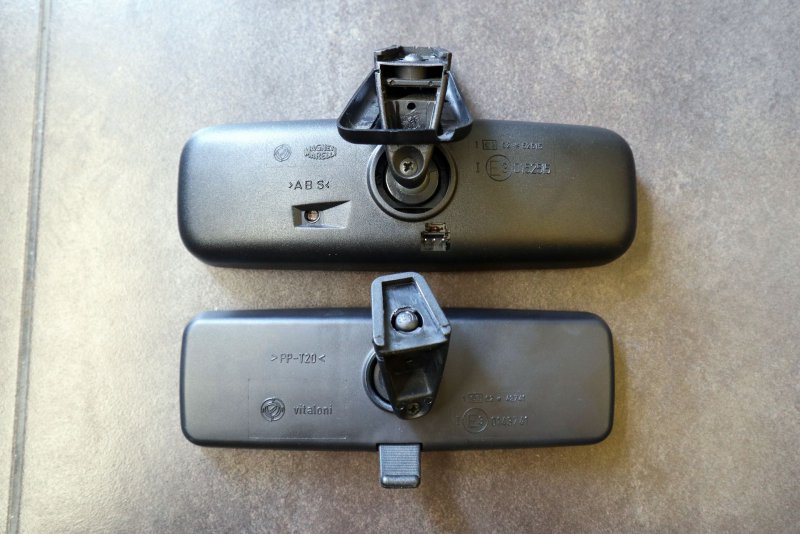
3 pins at the back of the dimming one:
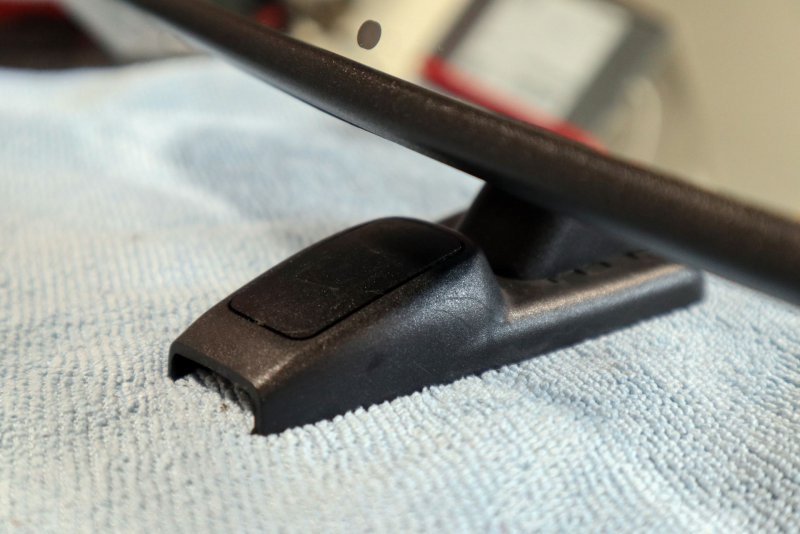
The mirror came also with a cover that has the option for the microphone in the Coupe, see the blanking plate:
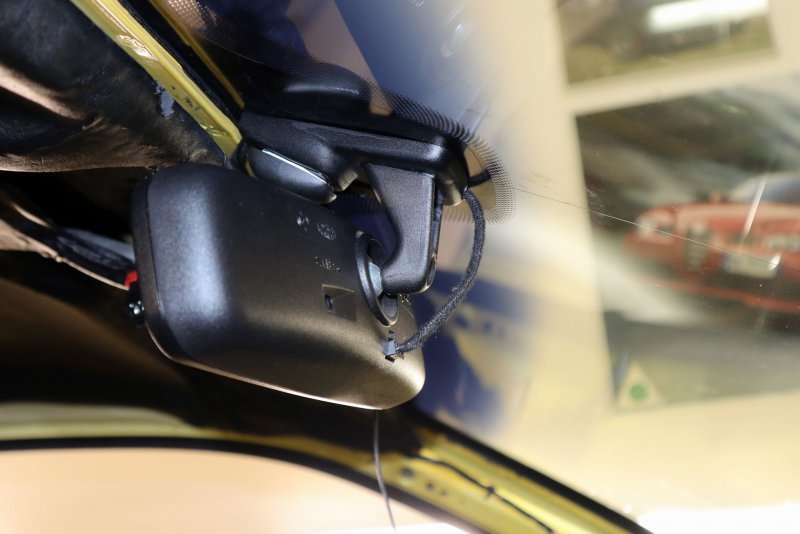
I cut a slot into the blanking plate to pass the mic wire and installed the Becker mic with double sided tape on top:
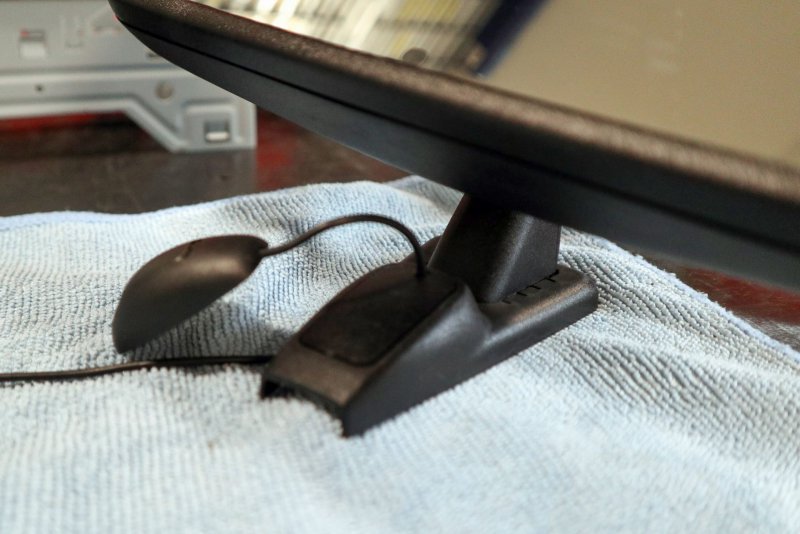
Looks pretty good there. If I had the Coupe mic I could do it really OEM, but I was not able to find one and no sense to order it for crazy money from Maserati.
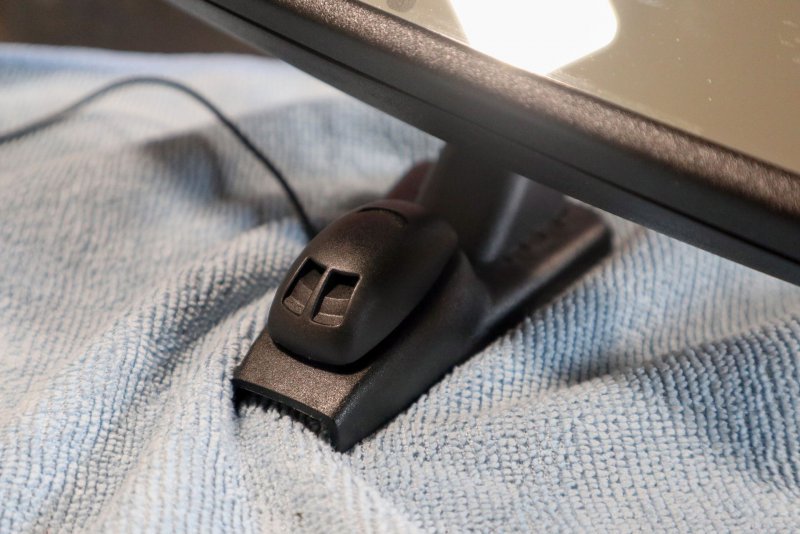
And here it is installed:
I installed the GPS antenna on the dash right of the central vent with double sided tape, that´s the small black box sitting on top:
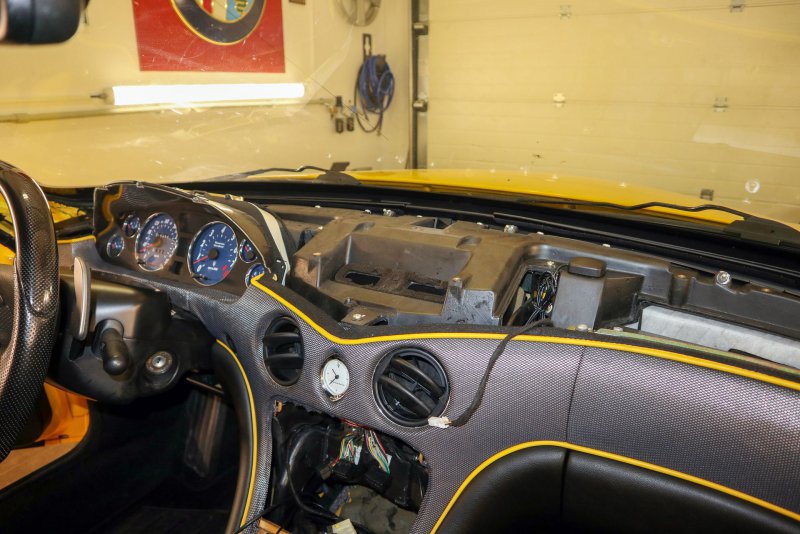
Assembled all back together in reverse order:
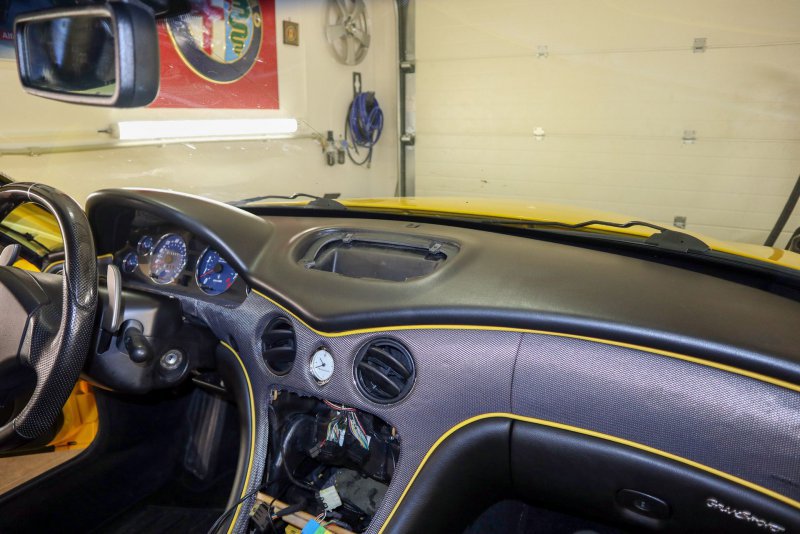
Put back the central console, prepared the wiring for the new headunit:
And slid it in:
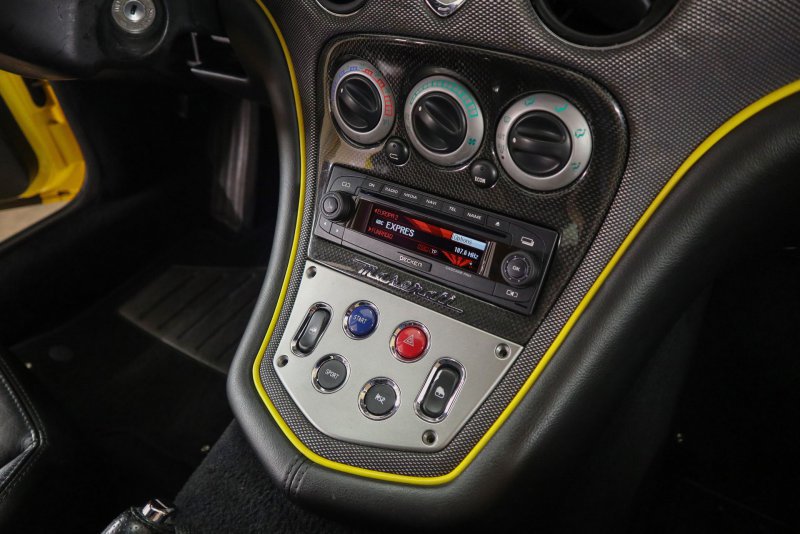
To me looks great, exactly what I wanted. Great head-unit design matching the interior, good sound, Bluetooth handsfree and as a bonus a "cute" satnav that I will never use but is charming to see these old systems showing you arrows and telling you where to go without showing a map. Period appropriate for the GS and surprisingly I also found a 2019 Europe maps for it

3 pins at the back of the dimming one:

The mirror came also with a cover that has the option for the microphone in the Coupe, see the blanking plate:

I cut a slot into the blanking plate to pass the mic wire and installed the Becker mic with double sided tape on top:

Looks pretty good there. If I had the Coupe mic I could do it really OEM, but I was not able to find one and no sense to order it for crazy money from Maserati.

And here it is installed:

I installed the GPS antenna on the dash right of the central vent with double sided tape, that´s the small black box sitting on top:

Assembled all back together in reverse order:

Put back the central console, prepared the wiring for the new headunit:

And slid it in:

To me looks great, exactly what I wanted. Great head-unit design matching the interior, good sound, Bluetooth handsfree and as a bonus a "cute" satnav that I will never use but is charming to see these old systems showing you arrows and telling you where to go without showing a map. Period appropriate for the GS and surprisingly I also found a 2019 Europe maps for it
Gp79
Member
- Messages
- 1,398
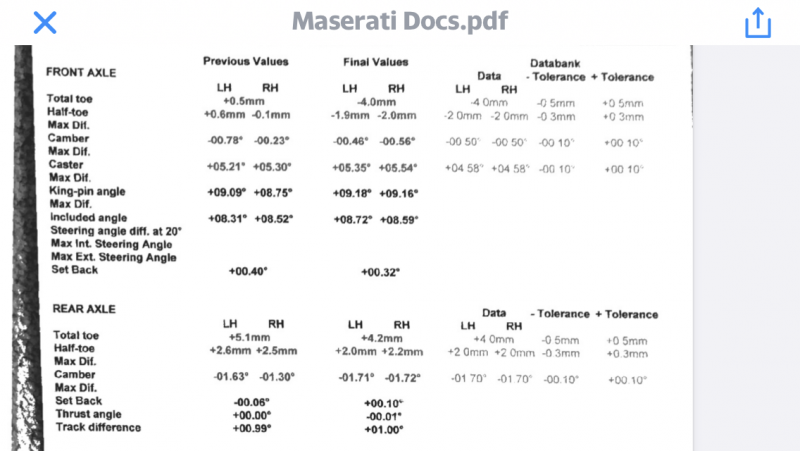
Here’s the alignment spec I used on my GS - RHD.Today I went to friends workshop for wheel alignment and AC recharge.
I spent few days researching the correct alignment spec for GS, not the easiest info to get.
In summary, I wanted to align only the front tracking as for camber adjustment I don´t have the shims available (yet). And after replacing the steering rack and having tracking done by eye only this was the most important topic.
If the data I found are correct, than Coupe is set at the front to toe-in, but GS is set to toe-out. I found data that it should be in the -0°14´ to -0°18´ toe-out per side range or about -0°30´ total toe-out.
Mine was set to about 0°30´ toe-in per side what is pretty good considering I did it only by eye when installing the track rods and track rod ends. I did set it now on the lower end of the recommended toe-out range, about -0°14´ per side.
The front camber is supposed to be -0°30´ or put differently -0,5°. Mine is a bit asymmetrical. On the left wheel I have a bit too much -0° 47´ and on the right side I do have too little -0°14´ So I need to get some shims for the upper arms. On the right wheel I see about 2mm shim, so there should be space to increase camber and on the left I need to add a bit.
Did anybody play with it and has experience how much effect does 0,5mm or 1mm shim have on camber change? If yes, thanks for advice.
At the rear I have not touched anything. The recommended range is same values as in the front, just positive, so toe-in of +0°14´ to +0°18´ and my car was in this range.
Same as front, I have a gap in the rear camber. The recommended range is -1°36´ to -1°48´ And I have -1°27´ left and -1°11´ right. So I need some shims under the bottom rear arms anchors to push them out a bit and increase the rear camber, especially on the right.
All together, I am quite pleased with the results. The geometry is in range or close now. I can play with up to perfection a bit later. Ideally after corner balancing the car, only issue is to get the corner weights here what is close to impossible.
Another job was to have a look at the A/C. And the system was empty indeed. Or almost empty. We pulled out only 70g of the gas. On the positive side, it passed the vacuum test so at least I know there is no major leak. There can still be some tiny tiny leak and the gas will leak out over the next weeks/months, but only time will tell. We recharged the recommended 750g of gas as the A/C started to work. I would not rate it as perfect A/C, felt like my old Alfa 159 that was not the best one, but it works! At 22 degrees outside temperature I was able to measure 12 degrees air coming out of the interior vents. I had it on while still connected the the machine and seems to works fine. About 10-13bar on the HP side and 1bar on the LP side when running on the full power (temp set to LO). So for the moment I will hope for the best that the system was empty due to the car almost not being used during the last years and lets see if it still works later.
Source was from a Maserati main dealer so assume correct?!
gotcha
Member
- Messages
- 78
Here’s the alignment spec I used on my GS - RHD.
Source was from a Maserati main dealer so assume correct?!View attachment 100876
Perfect. Thanks Gp79 for another source.
It confirm my findings, the confusing part is that different sources use different ways to display them. But -0,5° camber is the same as -0° 30´ or half degree. Same at the back. -1,70° is the same as -1°42´
For toe some databases use mms and some use degrees, I cannot convert one into another, but at least they are consistent about the toe being the same value front/rear; just negative toe-out at front and positive toe-in at rear but in the same extent.
jasst
Member
- Messages
- 2,316
Have a look at these figures, it is the settings developed by Emblem sports cars to improve the handling and do away with the inner tyre wear that results from the standard settings, https://www.sportsmaserati.com/index.php?threads/gransport-wheel-alignment-settings.29341/
Zep
Moderator
- Messages
- 9,232
At 22 degrees outside temperature I was able to measure 12 degrees air coming out of the interior vents. I had it on while still connected the the machine and seems to works fine. About 10-13bar on the HP side and 1bar on the LP side when running on the full power (temp set to LO). So for the moment I will hope for the best that the system was empty due to the car almost not being used during the last years and lets see if it still works later.
Your pressures seem a bit off. 1 bar gauge on the suction is an evap temp of -10 deg C with R134a. To me this suggest something is not right with the drier or expansion (TXV) valve. That you are getting 12 deg C from the vents means the volume flow of refrigerant is low.
I’d be looking at the temperature drop across the drier in the first instance as a blockage here is the most likely cause of this type of operation.
gotcha
Member
- Messages
- 78
Your pressures seem a bit off. 1 bar gauge on the suction is an evap temp of -10 deg C with R134a. To me this suggest something is not right with the drier or expansion (TXV) valve. That you are getting 12 deg C from the vents means the volume flow of refrigerant is low.
I’d be looking at the temperature drop across the drier in the first instance as a blockage here is the most likely cause of this type of operation.
That makes perfect sense, system works but the flow of refrigerant is partially blocked. Thanks for the insight. What HP and LP line pressures are considered "normal" with the system working fine?
I will hope the TX valve is OK as I really don´t want to replace that one but as I am still not sure if there are no other issues or leaks in the A/C, I do actually have the dryer and all A/C system O-rings on order just in case
Zep
Moderator
- Messages
- 9,232
That makes perfect sense, system works but the flow of refrigerant is partially blocked. Thanks for the insight. What HP and LP line pressures are considered "normal" with the system working fine?
I will hope the TX valve is OK as I really don´t want to replace that one but as I am still not sure if there are no other issues or leaks in the A/C, I do actually have the dryer and all A/C system O-rings on order just in caseI am pretty sure my dryer is original, so 17 years old, will probably not hurt to replace it in any case.
No problem. I’d be looking for something around 1.8-2 bar LP hovering around 0-2 deg C to prevent ice forming on the evaporator. Your HP pressure gives 50 deg C condensing temp, which is high for the ambient, but likely to have the same cause.
It is usually the drier in these cases, so you might get away without the TXV. That it was empty for sometime isn’t on your side though.
Attachments
gotcha
Member
- Messages
- 78
Today I tackled two jobs around steering column. One issue I found when I bought the car was that if I have the cruise control on and put left indicator, cruise switches off. Right indicator was fine. So probably a crushed wire somewhere in the indicator stalk. Second issue I found much later. At heavy braking when I pushed the steering wheel harder it just moved a bit it my hands. Later at stop I realized that if I apply a bit more force on the steering wheel, I can"adjust" it a bit in both axis without unlocking the lever. Not in full range, but it was just loose a bit under medium force.
The indicator stalks are from Alfa 166. I read there is some very tiny difference, not sure which one now, because by luck I found indicator stalks from a 4200 at a Polish breaker for under 50€. In very nice condition. Jackpot.
I started with removing the steering wheel and disassembly. First step as with most electric jobs is to disconnect the battery, but here even more important due to removing of the airbag.
Airbag i held from the back by 2 screws, the safety version of torx T30 with the nipple in the middle:
Removing airbag allows to disconnect the horn buttons and and remove the 4 hex screws holding the steering wheel on:
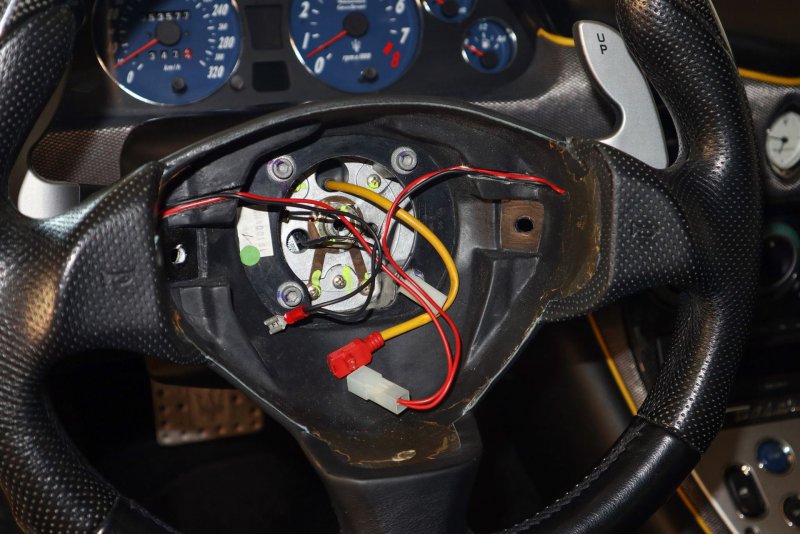
After removing the wheel it is possible to remove the upper and lower steering column plastic cover. There are two tiny screws connecting them together behind the wheel and 5 hex crews holding the bottom cover from its underside:
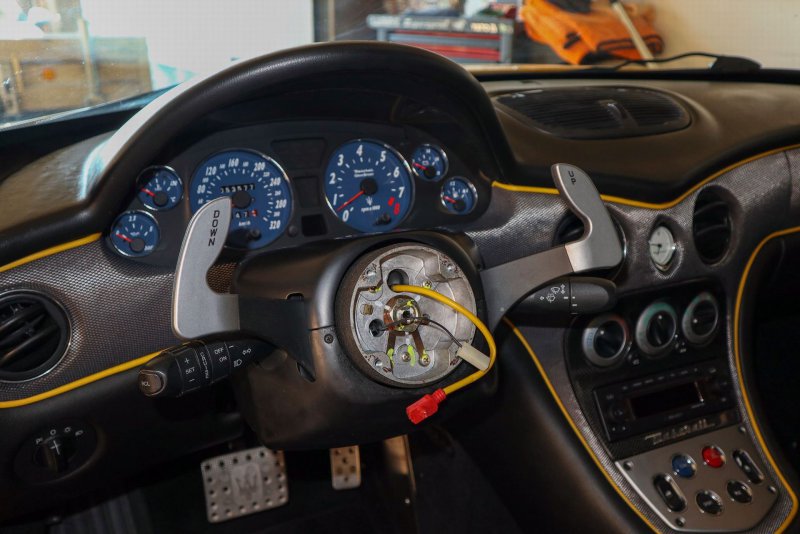
Than I removed the hub. It is held by 24mm nut in the middle. Maybe it is best to crack it loose still with the steering wheel on to be able to hold it. In my case I applied the force against the steering wheel lock, but my nut was surprisingly loose anyway. To slide the hub off the steering shaft is a bit more tricky. One option is to do it together with the steering wheel by jerking it off. I used a three leg puller. With he nut just loose but not completely removed to be safe once it get free off the shaft.
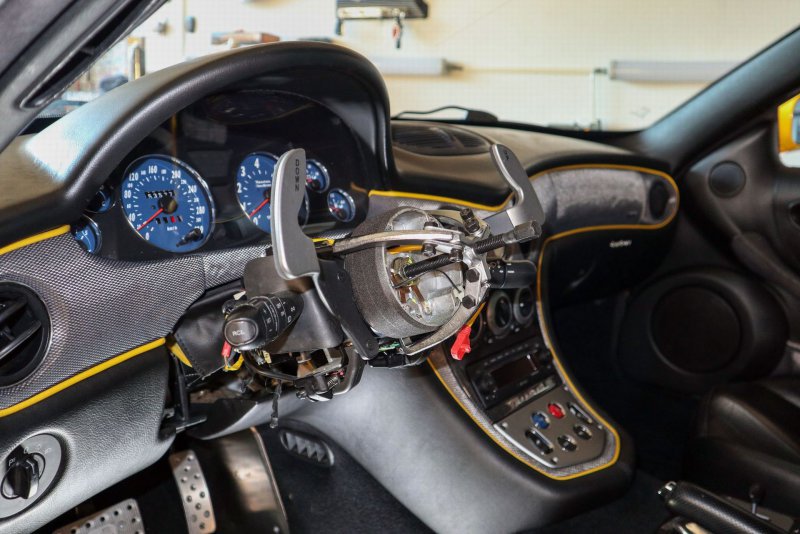
Removing the hub, don´t rotate the clock-spring at its back and store it safely. You will also need to disconnected the wire from the clockspring behind the stalks.
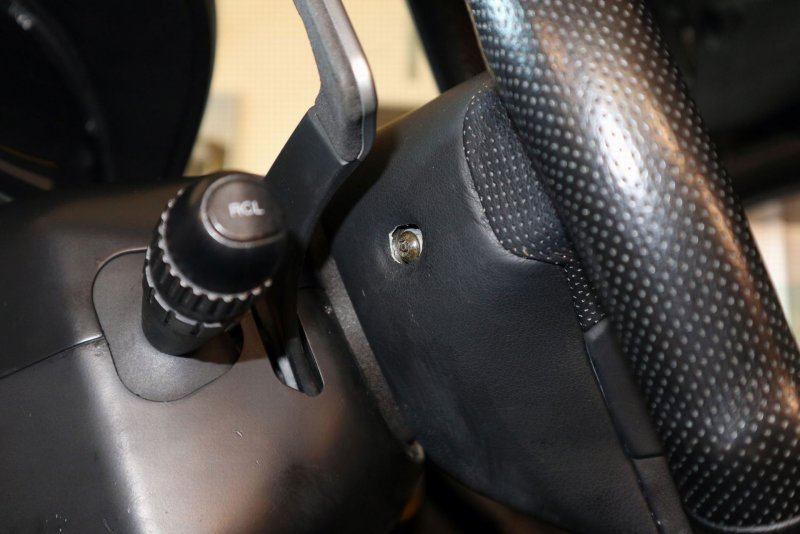
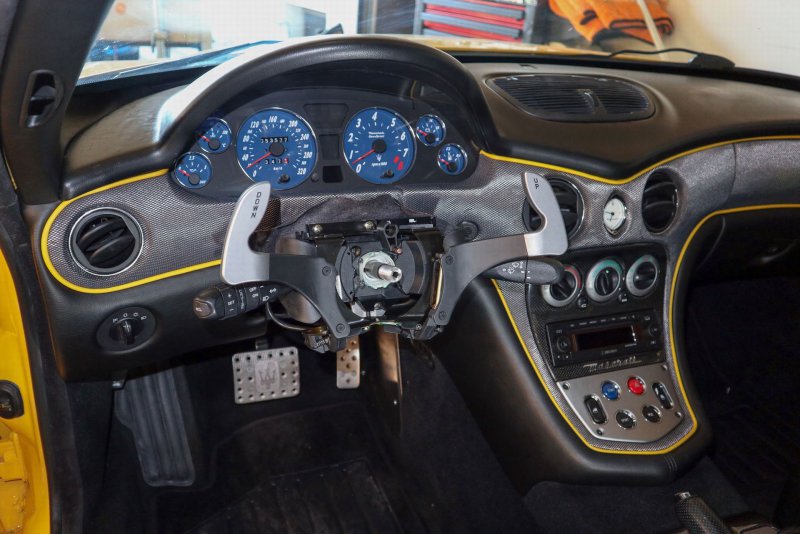
The paddles are held by 3 screws, they have brass/golden color. Two at the top, visible on the picture and one at the bottom. Also, one connector needs to be unplugged.
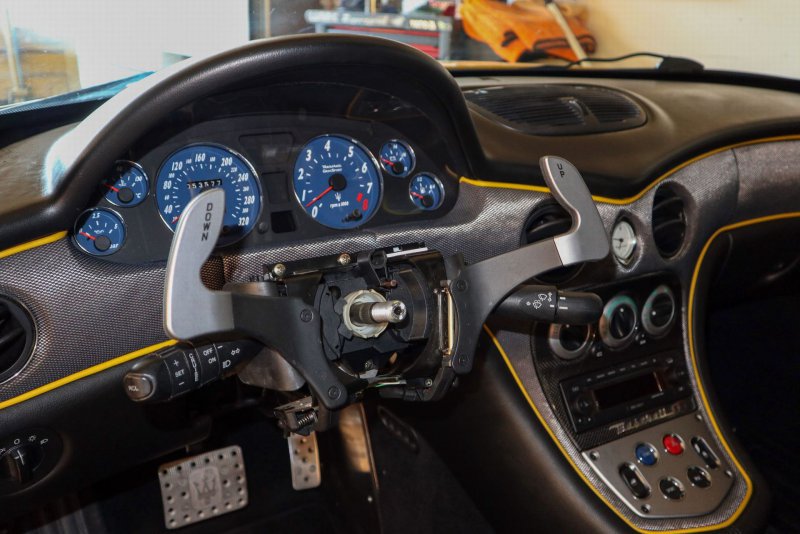
And last ones are the stalks. They are held by 2 screws by the steering shaft and have at least 3 or 4 connectors at the back:
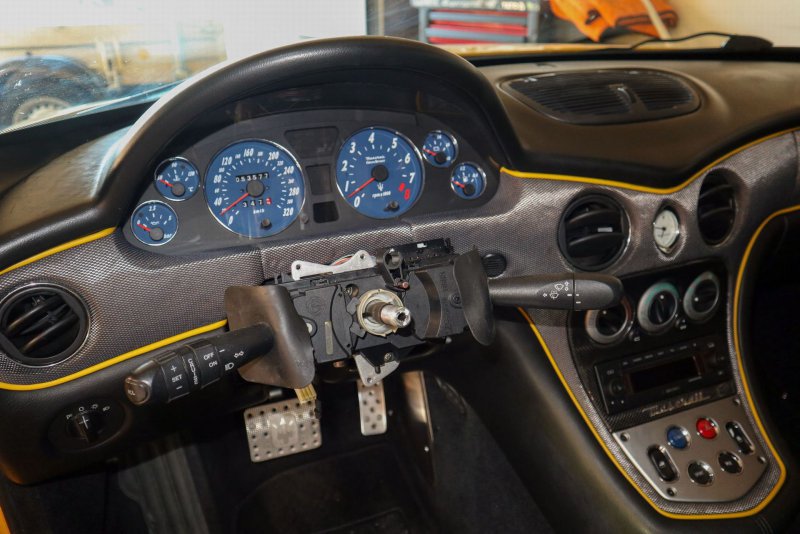
All cleaned now:
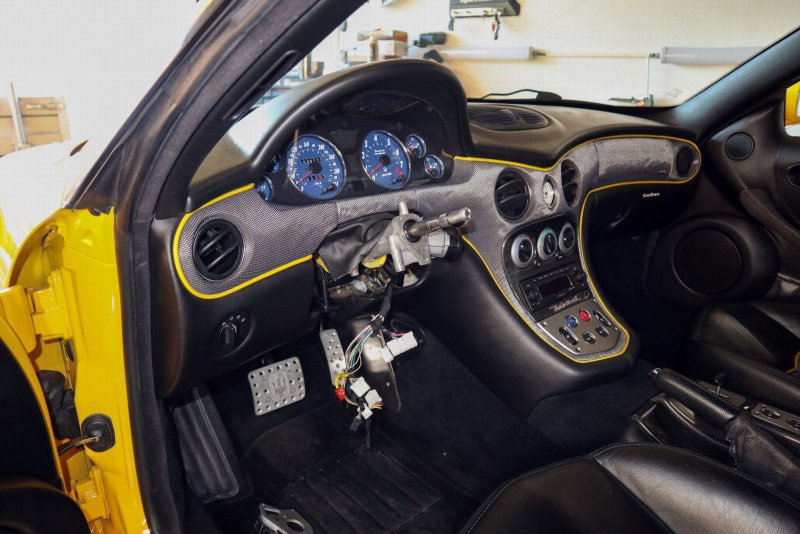
I hated the wiring loom mess with exposed wires and old tape falling of it:
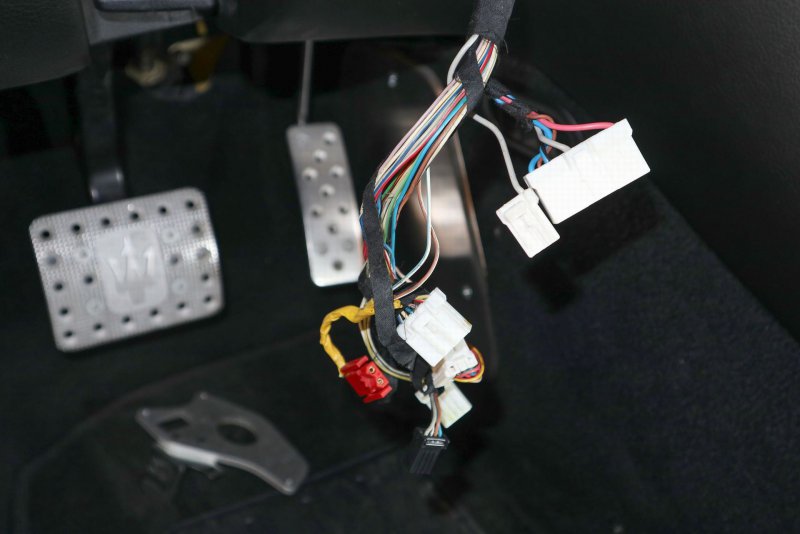
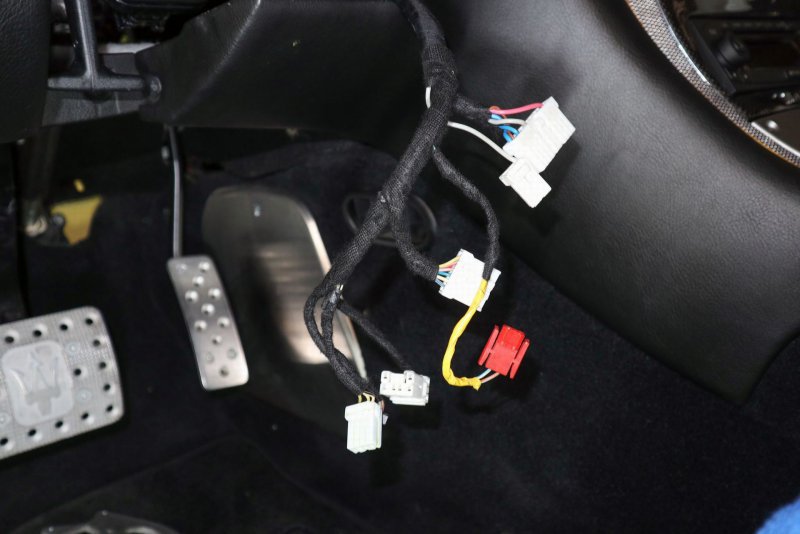
So I made it a bit more tidy with the textile tape for the wiring looms. Will avoid rubbing the wires or any vibration and noises.
And than I was able to get to the steering wheel lock mechanism. The mechanism is very similar to a shaft/lock on bicycle wheel hub. Level on one side that acts like a cam and tightens when locked. And adjustable nut on the other side with which you can adjust the cam pressure. In this case there is a nut and a locking nut on its top. just behind the ignition barrel. As you can see, there is a yellow mark from the factory marking them as tightened and checked. but the stripe is only on the metal base. On the nuts it is actually form the other side, meaning over the time them managed to rotate about half turn and loosen up. I loosened the upper nut, tightened the bottom one about half turn as it should be (checking with steering wheel lever if all is OK) and than locked it back with the upper one.
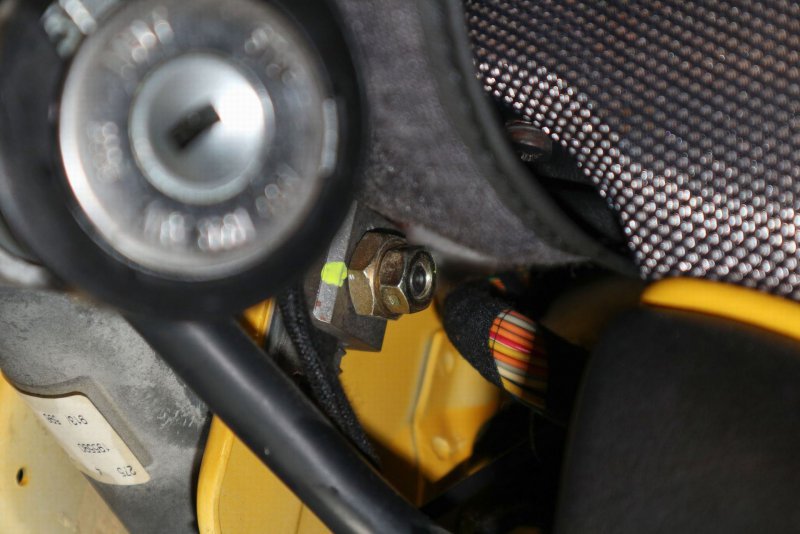
Perfect, the steering shaft is now safely locked in place when the adjusting lever is in locked position. one issue sorted.
The indicator stalks are from Alfa 166. I read there is some very tiny difference, not sure which one now, because by luck I found indicator stalks from a 4200 at a Polish breaker for under 50€. In very nice condition. Jackpot.
I started with removing the steering wheel and disassembly. First step as with most electric jobs is to disconnect the battery, but here even more important due to removing of the airbag.
Airbag i held from the back by 2 screws, the safety version of torx T30 with the nipple in the middle:

Removing airbag allows to disconnect the horn buttons and and remove the 4 hex screws holding the steering wheel on:

After removing the wheel it is possible to remove the upper and lower steering column plastic cover. There are two tiny screws connecting them together behind the wheel and 5 hex crews holding the bottom cover from its underside:

Than I removed the hub. It is held by 24mm nut in the middle. Maybe it is best to crack it loose still with the steering wheel on to be able to hold it. In my case I applied the force against the steering wheel lock, but my nut was surprisingly loose anyway. To slide the hub off the steering shaft is a bit more tricky. One option is to do it together with the steering wheel by jerking it off. I used a three leg puller. With he nut just loose but not completely removed to be safe once it get free off the shaft.

Removing the hub, don´t rotate the clock-spring at its back and store it safely. You will also need to disconnected the wire from the clockspring behind the stalks.
The paddles are held by 3 screws, they have brass/golden color. Two at the top, visible on the picture and one at the bottom. Also, one connector needs to be unplugged.

And last ones are the stalks. They are held by 2 screws by the steering shaft and have at least 3 or 4 connectors at the back:

All cleaned now:

I hated the wiring loom mess with exposed wires and old tape falling of it:

So I made it a bit more tidy with the textile tape for the wiring looms. Will avoid rubbing the wires or any vibration and noises.

And than I was able to get to the steering wheel lock mechanism. The mechanism is very similar to a shaft/lock on bicycle wheel hub. Level on one side that acts like a cam and tightens when locked. And adjustable nut on the other side with which you can adjust the cam pressure. In this case there is a nut and a locking nut on its top. just behind the ignition barrel. As you can see, there is a yellow mark from the factory marking them as tightened and checked. but the stripe is only on the metal base. On the nuts it is actually form the other side, meaning over the time them managed to rotate about half turn and loosen up. I loosened the upper nut, tightened the bottom one about half turn as it should be (checking with steering wheel lever if all is OK) and than locked it back with the upper one.

Perfect, the steering shaft is now safely locked in place when the adjusting lever is in locked position. one issue sorted.
gotcha
Member
- Messages
- 78
Than I swapped the stalks. But first I decided to properly clean the used ones from the breaker as as I am usually curious how things work I decided to open, clean and grease them:
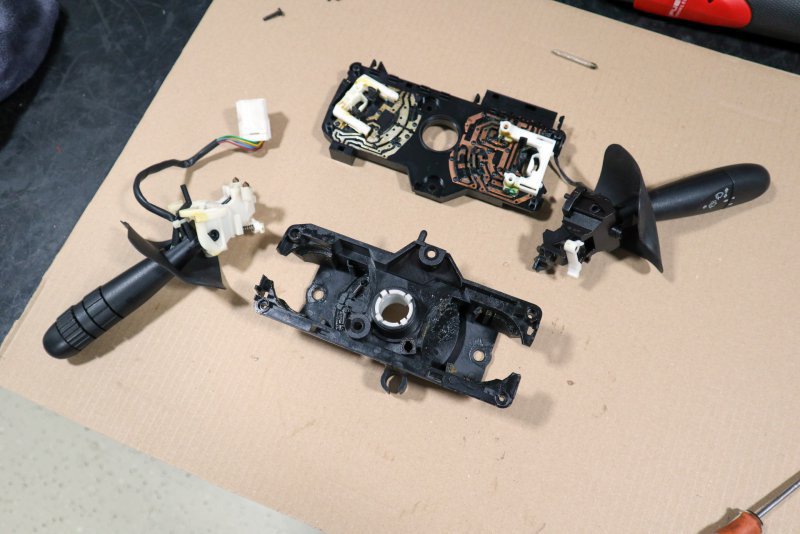
Well, I do recommend this only if you like mechanical puzzles On the picture it is not that bad yet, but it fell into many more pieces that you need to guess where and how they belong to put them together
  But I managed and now they are clean and I greased all moving parts.
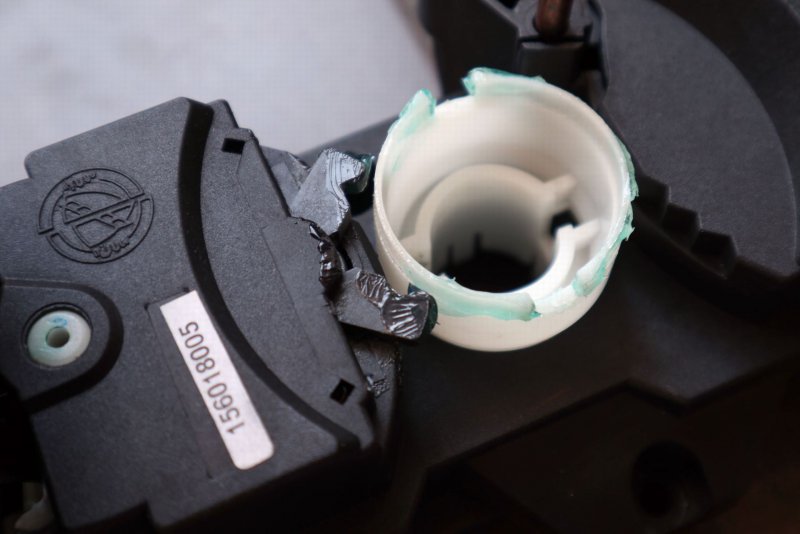
The indicator stalks on Alfa 166 are known to fail in a way that the indicator is not returning to the home position when putting the wheel straight after exiting the corner. What a surprise Maserati develops the same fault but it is not so known as typical Maserati has usually much lower mileage than typical Alfa 166 Mine was "half way". Indicator did return, but not consistently. The "new" stalks seemed a bit better. This is the mechanism returning the stalk. The black "horns" on the left are moved with indicator and the white plastic collar is rotating with the wheel and grabs on them thus returning the stalk. The wear comes either from the white collar where the protruding parts "grind down" or more typically from the black plastic horns that get rounded off and the collar has no good surface to grab on. All I could do is to clean and grease the mechanism.
After installing the stalks I run into a dilemma. From the breaker I got also MC Victory set of paddles. I think he had no idea what he had as they were dirty cheap. I was not sure if I want them on my car, but for the price I could not leave them there so I bough them.
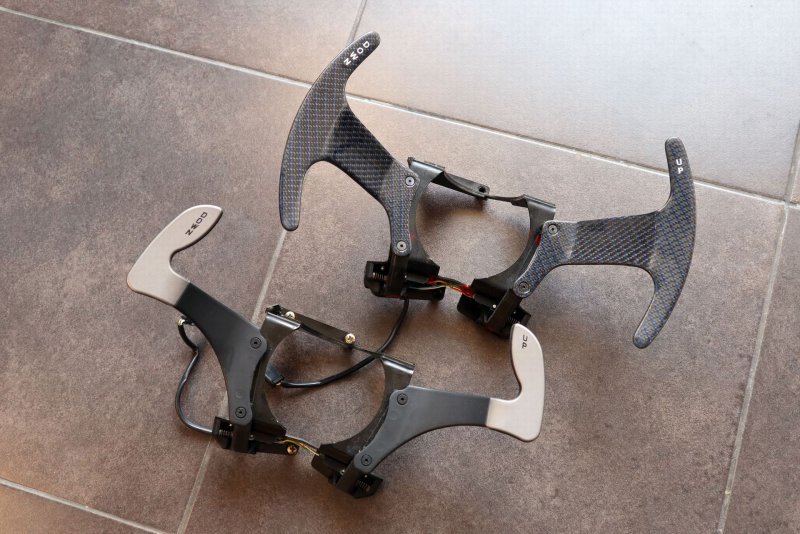
I tried them on, but my issue with the blue MC carbon is that it does not match the rest of grey carbon bits in the interior. If they were grey, I would install them immediately. Now I don´t know. They have some light scratches so they need a polish anyway, I will probably decide later if I want them or not. For the moment I decided to go with the original ones. Maybe later.
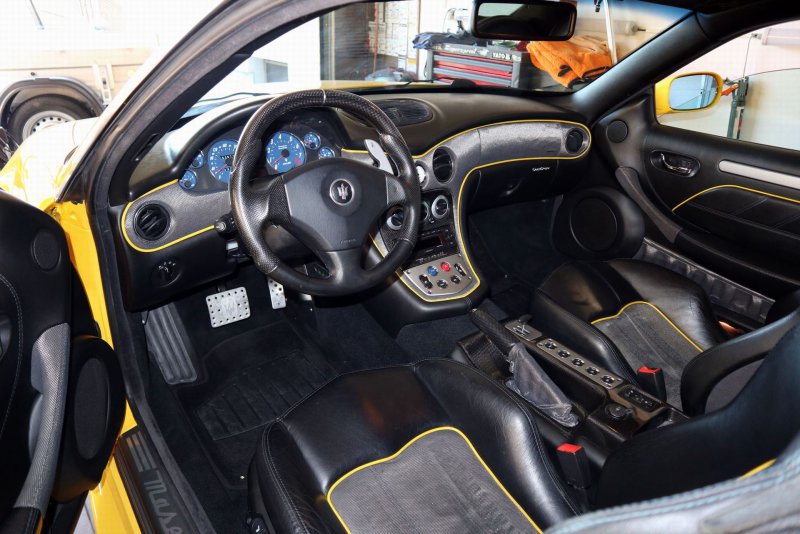
The rest is just the usual "assembly in the reverse order"

Well, I do recommend this only if you like mechanical puzzles
The indicator stalks on Alfa 166 are known to fail in a way that the indicator is not returning to the home position when putting the wheel straight after exiting the corner. What a surprise Maserati develops the same fault but it is not so known as typical Maserati has usually much lower mileage than typical Alfa 166

After installing the stalks I run into a dilemma. From the breaker I got also MC Victory set of paddles. I think he had no idea what he had as they were dirty cheap. I was not sure if I want them on my car, but for the price I could not leave them there so I bough them.

I tried them on, but my issue with the blue MC carbon is that it does not match the rest of grey carbon bits in the interior. If they were grey, I would install them immediately. Now I don´t know. They have some light scratches so they need a polish anyway, I will probably decide later if I want them or not. For the moment I decided to go with the original ones. Maybe later.

The rest is just the usual "assembly in the reverse order"


