QPV Sport GTS - Grill Refurb Blog

makeshiftUK

Member
Messages
1,090
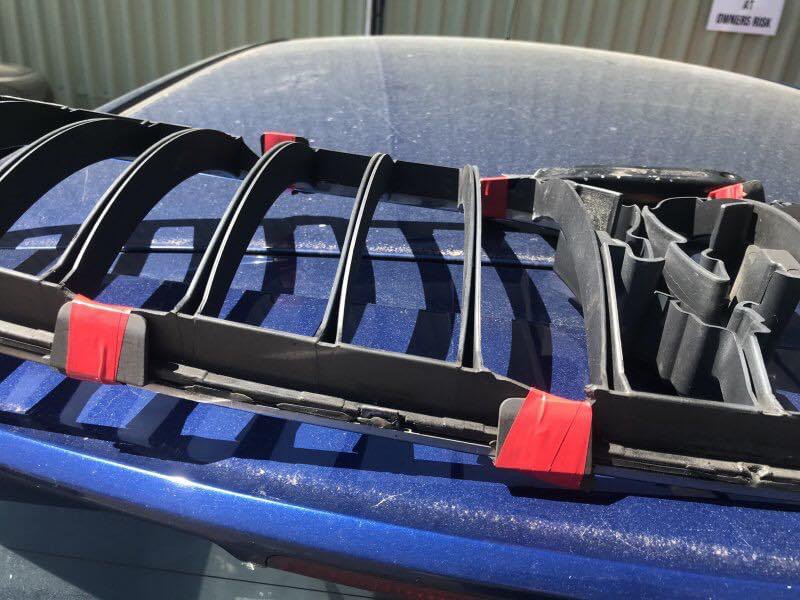
Spring clamps off from last night:

68935

Not quite as happy vs. my 1st repair as the result wasn't quite as 'flush', but nonetheless significantly better (and stronger) than it was.

Last application of strips this evening was a lot fiddlier...

68936
68937

The large crack was simple. I had a small plastic tab I tried to re-attach... but because the surface area was so small, it was a challenge to get it to stay in place... got there in the end, though.

Can't wait to pick the thing up tomorrow - hopefully it'll feel solid like it did when it was first produced.
 
Last edited:

makeshiftUK

Member
Messages
1,090
Bit more progress this weekend. 1st application of filler... sanded down with 180, then 600 grit wet and dry.

69098
69099
69102
69103

Whilst I'm fairly pleased with the results, the larger repairs filling in the 'gaps' were a bit notchy... so a 2nd application of filler went on today... as they say, in for a penny, in for a pound!
 

makeshiftUK

Member
Messages
1,090
Another week of lockdown has gone by and I've achieved a little more on this project. When Saturday AM arrived I did find myself having to put the front numberplate back on... I was itching to take her for a blat having been sat on the drive motionless for 2 weeks... or was it 3. I masking taped secure the parking sensors, and drove her grill-less!

69448

I made the mistake of using wet and dry paper 'wet' for the initial sanding of the body filler... when instead it should only be used wet in-between coats of paints.

2nd application of filler went on, and the repair areas are a lot smoother.

The whole of the grill was sanded down with 600 wet and dry, and the bottom rubber 'lip' got wrapped in masking tape to protect it from abrasion. The trickiest part was the Trident...

69449
6945069451
69452
69453

I made the mistake of putting the grill 'flat' on my kitchen surface... which applied pressure to a few of my repairs. As a result a few cracks have started to appear, my hope is some high build filler primer will mask the imperfections.

Next step - clean and thorough degrease, then plastic primer (ordered a few days ago, as I realised I ordered 'regular' primer which isn't quite as tolerant of the flex in plastic applications).
 
Last edited:

makeshiftUK

Member
Messages
1,090
Time for a top tip... I was having a nightmare trying to polish up my chromed plastic, and I wanted to avoid using metal polish (too harsh for chromed plastic) and I didn't want to buy an entire tube of yet more cleaning product.

I started by using some car interior plastic shine-up spray - not really much good. A few google searches online seemed to suggest toothpaste (yes, toothpaste) given it's mild and gentle abrasive qualities... and it worked OK. BUT - following some more suggestions online I gave Meguiars 'PlastX' a go (I used it only last week to restore my BMW's hazy taillights) and it did the job BRILLIANTLY. I literally used ball-bearing sized amounts with a microfibre cloth, working my way round methodically...

69479
694806948169482
 

makeshiftUK

Member
Messages
1,090
Hycote Plastic Primer arrived this week, which prompted a final degrease and some spray-age today.

Masked off the rubber lip...

6969869699

Parking sensor mounts treated to 3 coats...

69700

The grill itself received 3.5-ish coats and I ran out of primer towards the end.

697016970369704

I probably would have given it one more coat if I had more primer left over, but I don't think I'll bother purchasing another rattle can of the stuff. Aside from a few minor instances of paint-run, so far so good... like WaveyDaveys thread however, my crack repairs are showing slightly, so I suspect I'll be having a stab at the high build primer as the next stage.
 
Last edited:

makeshiftUK

Member
Messages
1,090
I started the peripheral work I had in my mind to get done prior to re-fitting the grill... Meguiars Ultimate Black plastic restorer on the air dam, and a coating of Hammerite satin black on the mesh grill behind.

6983469835

The Meguiars Ultimate black wasn't perfect, but certainly an improvement. I suspect I'll go over it again, but given it'll be concealed by the main grill I won't lose too much sleep over it.

6983369836

The Hammerite did the job of covering up the chips in the mesh. The viscosity of the paint doesn't allow for a very smooth finish, and originally I intended to use this same paint to bring the other mesh grills back to their former glory... the 2 by the fog lights, and one underneath the grill section. For those I'll likely attempt to remove and spray black, vs. doing anything in situ.
 

ChrissGT

Member
Messages
341
I used a simple rattle can matte black paint on the side grills and applied it with a small brush. Seemed to do the job fine. Since it is spray paint it is pretty thin and easy to apply.

But either way, its a detail but it looks much better after a bit of painting. But since its such a detail i wanted to be a fast fix.
 

makeshiftUK

Member
Messages
1,090
I used a simple rattle can matte black paint on the side grills and applied it with a small brush. Seemed to do the job fine. Since it is spray paint it is pretty thin and easy to apply.

But either way, its a detail but it looks much better after a bit of painting. But since its such a detail i wanted to be a fast fix.
Good tip! And with your method there's no need to remove the mesh grills, is there?
 

makeshiftUK

Member
Messages
1,090
Procrastination has been getting the better of me... must push on to Moscow.

Anyway, I thought I'd use my parking sensor mounts as the guinea pigs for the Satin Black top coat (originally I bought Matt Black, but later decided against it). Some 2500 grade wet and dry levelled the rough surface of the primer, in preparation for the top coat... 2500 sanded on the left, and pre-2500 sanded on the right:

70530

Both sanded with 2500:

70525

You'll recall I ran out of plastic primer towards the end of the can, resulting in a thin coat... you can see some of the original colour starting to come through. I decided I wouldn't lose sleep over it but for these parkings sensor mounts, but would order more plastic primer for the main grill.

5 coats of Satin Black topcoat, and here are the results:

70526
70527

The eagle eyed amongst you will notice a few craters in the 'face' of the mounts... yes, I could/should have sprayed them with high build primer, but who's looking right ;)
 
Last edited:

Gazcw

Member
Messages
7,762
If the paint doesn't work out for you. I had to buy 4 new ones from Ross when I switched from S to GTS grill. Reasonable price tbh.
 

makeshiftUK

Member
Messages
1,090
Final sanding (2500 wet and dry) of the main grill today all complete... followed by a wash with car shampoo, and wipe down with white spirit after. It's as smooth as... well, a very smooth thing.

Too bad it's just started to rain, I was hopeful of getting the topcoat done this weekend.

710537105471055
 

makeshiftUK

Member
Messages
1,090
And finally, my second favourite part of this process - the satin black topcoat, which seems to be a near-perfect match. I lost count of how many coats I gave it the best part of two rattle cans worth.

71129711307113171132711337113471135

I removed the masking tape after taking the pictures, and there's a bit of minor cleaning up to do on the bottom rubber lip. Once that's done and the paint fully cured, I'll re-attach the parking sensor housings, the chrome edge and the famous trident.

It's certainly not perfect, but arguably much easier on my wallet vs. purchasing a new one - and much more satisfying. The finish I'm pleased with - with the exception of paint run and dust settling on on the face of the trident (to be covered by the plastic trident anyway), and a few 'bobbly' areas where I've used filler to perform a repair.

Final list of parts used:
  • 1.6mm x 12mm x 400mm aluminium strip - £3.99
  • UPol High build primer - already had this
  • Hycote plastic primer x2 - £8.95 + £7.99
  • Hycote Satin Black x2 - £7.49 + £6.99
  • White Spirit - already had this
  • Meguiars Ultimate Black Plastic Restorer (to spruce-up the air conveyer) OPTIONAL - £13.00
  • JB Plastic Weld - £5.50
  • Novol Bumper Filler - £7.99
  • Spring Clamps - £5.99
  • Various grades of wet and dry - already had these
  • Humbrol Gloss 220 'Ferrari' Red - already had this
  • Hammerite Black (to touch up mesh) OPTIONAL - £7.46
  • Meguiars PlastX (to polish plastic chrome) - already had this
  • Masking tape - already had this
Total: £54.89 (with optional items - £75.35).
 

Dman666

Member
Messages
1,160
Great job...mines in a similar state
 

Attachments

  • 48A3664B-DC5B-45BC-96B4-6BF9DDA41EC4.jpeg
    48A3664B-DC5B-45BC-96B4-6BF9DDA41EC4.jpeg
    135.4 KB · Views: 4

Dman666

Member
Messages
1,160
Give the above a go... it’s time consuming to do properly so definitely not something to be rushed, but equally you’ll probably have plenty of time on your hands to get stuck into this like I did ;)
Yeh i have started mine....fingers crossed it end up ok
 

makeshiftUK

Member
Messages
1,090
Chrome paraphernalia and parking sensors now refitted, and I must say I'm chuffed to bits... cannot wait to fit it this weekend.

I had to remind myself of how it was when I started this endeavour back in April by looking at my first post... chunks of plastic and securing clips missing, and a general feeling of little to no structural integrity.

71216712177121871219
 

makeshiftUK

Member
Messages
1,090
Here we go, fitted today:

71437714367143871439

Before...

71440

After...

71441

Divorce narrowly averted now that the grill is no longer the feature of our kitchen worktop :D