
You are using an out of date browser. It may not display this or other websites correctly.
You should upgrade or use an alternative browser.
You should upgrade or use an alternative browser.
4200 audio screen bezel
- Thread starter fcz360
- Start date


2b1ask1
Special case
- Messages
- 20,306
Frank, I believe it is possible to discount the screen and even the button set and keep all the connections in place but put them away behind the console on the 4200 so as to not upset the CAN-BUS and then you could put something like an iPad mini with a bezel in its place? Assume this is your intention? I did some work toward doing this before mine was nicked.
Navcorr
Member
- Messages
- 3,839
There's a class of hub or module based systems now - Alpine Freestyle, Pioneer DMH, etc. Re: moving the existing screen it is straight forward enough. The NIT too if required although these hubs will fit under the seat.Assume this is your intention?
Navcorr
Member
- Messages
- 3,839
You "may" struggle to put the Pioneer hub in the boot. They do offer an extension cable for the screen connect but its only 1.5M. Whether you could connect a few together? From memory, with sensible routing, you need about 11' length from rear corner to central dash.
Moving & keeping the infoscreen in the canbus system is simple to do using extensions to the original loom & NIT cabling. The grey NIT cable is 10 core, shielded, and uses connectors made with Hirose GT17 components. The 6 pin white screen connector uses TE Connectivity .070 Multi-lock components.
Have fun!
Last edited:
Navcorr
Member
- Messages
- 3,839
NIT cable Hirose GT17
To make a new NIT cable the following parts are required:

To extend the original NIT cable make a new cable with a header at one end instead:

In both cases make a straight through cable, i.e. pin1 to pin1, with a max. cable OD of 8mm.
I used Lapp Kabel 0034510 which is 8.3mm and it was fine. Total cost approx. £15.
The centre terminals are fiddly bu**ers to crimp & insert but if not able an auto-electrician should oblige.
You can add a ferrite core to the cable if you like but it's not been needed.
Screen Loom Connectors TE Connectivity .070

Having been quoted £25 (+shipping +VAT) for the male plug (which was "strange") original parts were sourced instead.
I used AWG 18 cores as had a bit left over from some other cabling. Total cable cost approx. £5.
Edit
If you want to the move the NIT too you can also extend both the ISO connection A and the white loom connection.
Highlighted green & red respectively below.

NIT Loom Connector TE Connectivity MQS

Ignore that the housing shown is black - it's a generic image.
You may have to fettle the original header at the back of the NIT to fit though.
One corner at the front edge is square rather than angled. Circled in blue above for comparison.
Carefully shave that back to an angle and the original loom connector still fits securely.
It will be obvious what needs to be done when the connectors are offered up.
Although an 18 pin header only 9 pins are used - 2, 6, 7, 8, 9, 12, 16, 17, & 18.
As with the NIT cable header, wires were soldered to the pins, heat shrunk, hot glued and taped for rigidity.
Total cable cost approx. £12
Summary
By using headers to make extension cables, without cutting or splicing original wiring, the process is easily reversible if required.
Both screen and NIT now reside in the boot where the CD changer used to be. Freeing up space up front for new equipment.
I haven't experienced any issues with signal integrity - in terms of strength nor interference.
Have also added a converter module to process NIT image signals for display on the replacement head-unit.
Together with a bridged, non-shorting, 2 pole rotary switch to give direct control over several functions of the original screen.
On/Off, Trip A/B, Trip Reset, etc. Wires are soldered as follows:

Note - all connector parts bought from Mouser which offered a fantastic level of service.
To make a new NIT cable the following parts are required:
To extend the original NIT cable make a new cable with a header at one end instead:
In both cases make a straight through cable, i.e. pin1 to pin1, with a max. cable OD of 8mm.
I used Lapp Kabel 0034510 which is 8.3mm and it was fine. Total cost approx. £15.
The centre terminals are fiddly bu**ers to crimp & insert but if not able an auto-electrician should oblige.
You can add a ferrite core to the cable if you like but it's not been needed.
Screen Loom Connectors TE Connectivity .070
Having been quoted £25 (+shipping +VAT) for the male plug (which was "strange") original parts were sourced instead.
I used AWG 18 cores as had a bit left over from some other cabling. Total cable cost approx. £5.
Edit
If you want to the move the NIT too you can also extend both the ISO connection A and the white loom connection.
Highlighted green & red respectively below.
NIT Loom Connector TE Connectivity MQS
Ignore that the housing shown is black - it's a generic image.
You may have to fettle the original header at the back of the NIT to fit though.
One corner at the front edge is square rather than angled. Circled in blue above for comparison.
Carefully shave that back to an angle and the original loom connector still fits securely.
It will be obvious what needs to be done when the connectors are offered up.
Although an 18 pin header only 9 pins are used - 2, 6, 7, 8, 9, 12, 16, 17, & 18.
As with the NIT cable header, wires were soldered to the pins, heat shrunk, hot glued and taped for rigidity.
Total cable cost approx. £12
Summary
By using headers to make extension cables, without cutting or splicing original wiring, the process is easily reversible if required.
Both screen and NIT now reside in the boot where the CD changer used to be. Freeing up space up front for new equipment.
I haven't experienced any issues with signal integrity - in terms of strength nor interference.
Have also added a converter module to process NIT image signals for display on the replacement head-unit.
Together with a bridged, non-shorting, 2 pole rotary switch to give direct control over several functions of the original screen.
On/Off, Trip A/B, Trip Reset, etc. Wires are soldered as follows:
Note - all connector parts bought from Mouser which offered a fantastic level of service.
Last edited:
Navcorr
Member
- Messages
- 3,839
There's not much to it frankly, Frank 
Just a fair bit of time to install - the connections need be 100% though.
Hence the suggestion about using an auto-electrician to make up the cables.
Particularly the NIT cable as the crimps are very small.
For reference, this is the insulator for the 10 terminals required.

I like the look of the Pioneer you're planning. If it were my choice I'd not bother moving the NIT, I'd simply put the Pioneer under a seat.
All you need to do then is decide where you want to site the infoscreen. Which would be more a question of whether you want easy access to it.
Just a fair bit of time to install - the connections need be 100% though.
Hence the suggestion about using an auto-electrician to make up the cables.
Particularly the NIT cable as the crimps are very small.
For reference, this is the insulator for the 10 terminals required.
I like the look of the Pioneer you're planning. If it were my choice I'd not bother moving the NIT, I'd simply put the Pioneer under a seat.
All you need to do then is decide where you want to site the infoscreen. Which would be more a question of whether you want easy access to it.
Last edited:
mjheathcote
Centenary Club
- Messages
- 9,046
There's not much to it frankly, Frank
Just a fair bit of time to install - the connections need be 100% though.
Hence the suggestion about using an auto-electrician to make up the cables.
Particularly the NIT cable as the crimps are very small.
For reference, this is the insulator for the 10 terminals required.
View attachment 61019
I like the look of the Pioneer you're planning. If it were my choice I'd not bother moving the NIT, I'd simply put the Pioneer under a seat.
All you need to do then is decide where you want to site the screen. Which would be more a question of whether you want easy access to it.
Very interesting.
What's in its place then?
Navcorr
Member
- Messages
- 3,839
A double din Kenwood. With the main box installed where the the NIT used to be and the 7" touch screen remote-mounted in the dash.
Have / am remodelling an original surround and have retained a number of the original buttons. Albeit, reassigned for different functions. Other than the hazard of course. This stage is almost complete with just the button illumination to sort. Essentially, keeping as much as possible of the look and feel of the original layout.
For example, the selection dial on the right hand side now operates an inline bass volume controller instead. The on/off/volume dial on the other side has been reassigned to control the rotary switch mentioned previously. Which controls which of the info screens gets displayed when required.

Trip options for example are useful to have access to. Also decided to keep access to the radio screen - which is oddly satisfying when listening to The Archers
One last thought. I quite like a car stereo, and whilst I prefer the functionality of a "proper" stereo, the new phone based hub systems are very good. Probably suit far more people than what Ive done and certainly an awful lot simpler to install too.
Have / am remodelling an original surround and have retained a number of the original buttons. Albeit, reassigned for different functions. Other than the hazard of course. This stage is almost complete with just the button illumination to sort. Essentially, keeping as much as possible of the look and feel of the original layout.
For example, the selection dial on the right hand side now operates an inline bass volume controller instead. The on/off/volume dial on the other side has been reassigned to control the rotary switch mentioned previously. Which controls which of the info screens gets displayed when required.
Trip options for example are useful to have access to. Also decided to keep access to the radio screen - which is oddly satisfying when listening to The Archers
One last thought. I quite like a car stereo, and whilst I prefer the functionality of a "proper" stereo, the new phone based hub systems are very good. Probably suit far more people than what Ive done and certainly an awful lot simpler to install too.
Last edited:
mjheathcote
Centenary Club
- Messages
- 9,046
Neat.
What converter module did you use, and how is this wired, to get the original display screen on the new screen?
What converter module did you use, and how is this wired, to get the original display screen on the new screen?
Navcorr
Member
- Messages
- 3,839
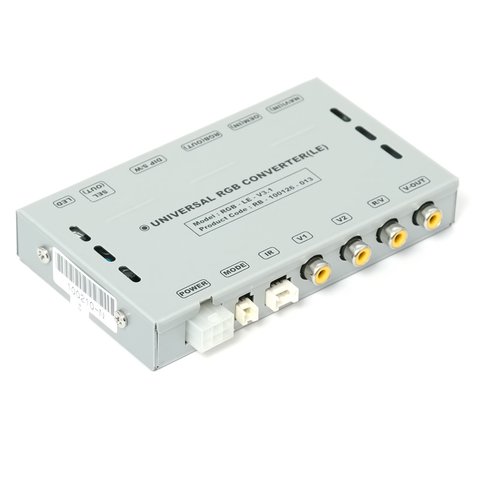
RGB4ALL – Universal video converter
The RGB4ALL is a universal video converter based on AD724 chip. It takes RGB signal on an input, encodes and outputs it to more convenient Composite video or S-Video sockets which are more often seen in modern TVs. It was tested with Amiga 500/600/1200, Amstrad 464/6128 and other hardware that...
Although the vendor has subsequently sold out.
Another NIT cable was made with the RGBs signals diverted to the module.
It outputs in composite to a video-in on the Kenwood.
Another cable installed. Which I was doing when I had a shelving collapse in the garage.
Still can't believe I got away without a scratch there.
mjheathcote
Centenary Club
- Messages
- 9,046
RGB4ALL – Universal video converter
The RGB4ALL is a universal video converter based on AD724 chip. It takes RGB signal on an input, encodes and outputs it to more convenient Composite video or S-Video sockets which are more often seen in modern TVs. It was tested with Amiga 500/600/1200, Amstrad 464/6128 and other hardware that...www.retro-cloud.eu
Although the vendor has subsequently sold out.
Another NIT cable was made with the RGBs signals diverted to the module.
It outputs in composite to a video-in on the Kenwood.
Another cable installed. Which I was doing when I had a shelving collapse in the garage.
Still can't believe I got away without a scratch there.
Okay sounds simple!!
It would be neat if you could just replace the original screen only, or have a switch box so the original screen could accept another source signal.
If you have determined the original NIT source can be converted, I'm sure there must be something available.
Like this?
Universal RGB Video Interface. Car Multimedia Adapter - Car Solutions
Universal RGB Low-End car video interface allows you to connect aftermarket navigation, rear view camera, external video sources, such as HD/DVD player, TV receiver to the OEM car monitor
Last edited:
Navcorr
Member
- Messages
- 3,839
Without trying it I wouldn't like to say one way or another. There would be a number of considerations though. Firstly, the screen connects to the PCB via a flat ribbon cable - not something to bugger about with imo. So I wouldn't try and display signals directly.
As that box has RGB output though it may be possible to feed those signals via a custom NIT cable. To be processed by the onboard chipset as if they were coming from the NIT. The considerations here are whether the box signal output is NTSC, at the correct voltages and whether it can manage the sync requirements.
Sync could be a stumbling block as pretty much all of the converters researched worked with separate horizontal & vertical sync signals. The NIT doesn't output seperately though which is what prompted the experiment with the converter I'm using. It's simplicity is its main advantage. If that box could be made to work though, as you've said, you would want the ability to switch between signal sources easily. A simple multi channel relay would do that.
All that said, if keeping the original screen is a prerequisite, why not install a carplay system similar to the Naviplus. With a smaller overlay obviously. There maybe a few tweaks necessary but it "really" couldn't be difficult to work out.
Last edited:
mjheathcote
Centenary Club
- Messages
- 9,046
The video interface I understand comes with a little remote to swop input signals, and if senses a reverse light switches to the rear view camera. That would be neat.
In reality, apart from doing it as a bit of a hobby, just don't do the mileage in the car to be worth the hassle.
I notice they do video interface kits for BMW's complete with the interface leads. Can see the benefits with my daily adding one just for a reversing camera.
Do post up when you have finished your install.
I do find it interesting.
Navcorr
Member
- Messages
- 3,839
That's fair enough, which is why I wasn't going to bother posting up anything here - haven't detected much of an appetite for these installs. Some of the MaseratiLife guys on the other hand - they love to get stuck in. Most of the info. is quite old now though but still useful.The video interface I understand comes with a little remote to swop input signals, and if senses a reverse light switches to the rear view camera. That would be neat.
In reality, apart from doing it as a bit of a hobby, just don't do the mileage in the car to be worth the hassle.
I notice they do video interface kits for BMW's complete with the interface leads. Can see the benefits with my daily adding one just for a reversing camera.
Do post up when you have finished your install.
I do find it interesting.
Re: the box above, found this:
Just had a quick scan through and they can "hijack" the factory ribbon cable. I recall one of the US guys (BeeYouZeeZee) a few years ago made reference to the NIT flat ribbon configuration being in a standard format. I'll try and find the post as this could well be a possibility.
Navcorr
Member
- Messages
- 3,839
Here you go:

 www.maseratilife.com
The Toshiba screen has a 30 pin flat ribbon whereas I count 28 pins on the hijack board.

Maybe worth an email to the vendor to see if they have alternatives. Checking very carefully the configuration.
Took apart the LCD display
The Toshiba screen has a 30 pin flat ribbon whereas I count 28 pins on the hijack board.
Maybe worth an email to the vendor to see if they have alternatives. Checking very carefully the configuration.
Last edited:
Navcorr
Member
- Messages
- 3,839
Another thought which may/may not be of interest. I've a spare infoscreen screen - the flat ribbon cable from which you'd be welcome to have.I notice they do video interface kits for BMW's complete with the interface leads.
I picked up a complete infoscreen assembly with a non-functioning screen - its the surround from this I'm remodelling and I used the pcb to keep in the system.
My original assembly is tucked away safely in a box!
Anyway, that hijack board above looks like a relay control system. Something along the lines of:
ELEGOO Relay Module 4 Channel DC 5V with Optocoupler: Amazon.co.uk: Electronics
Buy ELEGOO Relay Module 4 Channel DC 5V with Optocoupler for Arduino UNO R3 MEGA 2560 Project 1280 DSP ARM PIC AVR STM32 Raspberry Pi at Amazon UK. Free delivery and return on eligible orders.
www.amazon.co.uk
Maybe worth an experiment? If so you're welcome to ribbon cable, alternatively, perhaps see if that vendor has an option for a system that uses a Toshiba screen.
Last edited: