B16 ONX
Junior Member
- Messages
- 95
Hello everyone
Not bragging, not boasting but I managed to change the AC compressor in just over 2 hours this weekend.
The reason for this post? Simple, I looked up this job to see how bad my day was going to be & everything I read suggested an 8 hour, exhaust manifold removal job. As a result I booked myself the whole day to do it & was very happy when it was off the ramp a couple of hours later. As a result I wanted to share my experience with you all to give people in a similar situation the confidence to do it on their own. Quickly!
I did search for something similar but couldn't find anything, hence this post. If it already exists then please feel free to delete/move.
Tools required: Ratchet, 10mm socket, 10mm & 15mm spanner, 6mm hex socket, 5mm hex socket, 6mm hex bit, large phillips screw driver. Optional: Glue
Replacement compressor, new o rings
1: De-gass the system. I went to a friends garage who took out just under 500gms.
2: Raise car. I was lucky to have access to a ramp but it could be done on the floor.
3: Remove lower engine tray, 3x 10mm bolts at rear & two large phillips either side. Compressor is now right in front of you, very easy access.
4: 15mm spanner onto tensioner & pull the belt. Watch the direction of the spanner & push/pull accordingly to release tension on belt. Remove belt from AC & power steering pump. I left belt on the other pullies.
5: Using 6mm hex socket crack off lower & top bolts holding compressor to block
6: Remove pipes from rear of compressor. This is where I saw the reason people removed the manifold. It's quite close to the pipes & unable to get a normal socket & ratchet in to remove the bolt. So I used a 6mm hex bit, not a socket, just the actual bit on it's own. I then used the 10mm spanner to remove it. In hindsight, I would have put some glue on it to stay in place as it fell out twice. Not superglue, just some basic bonding agent to help keep it in place.
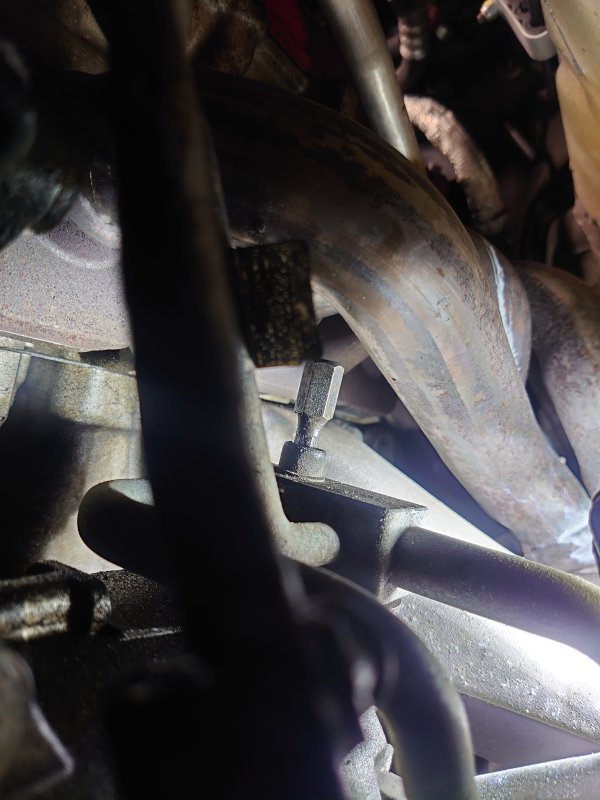
7: If you follow the ac pipe up from the compressor you'll see a 5mm bolt holding it to the head. Remove the bolt.
8: Remove both pipes from the rear of the compressor. Catch the o rings.
9: With the pipes out of the way you'll see the rear mounting 6mm bolt. Remove.
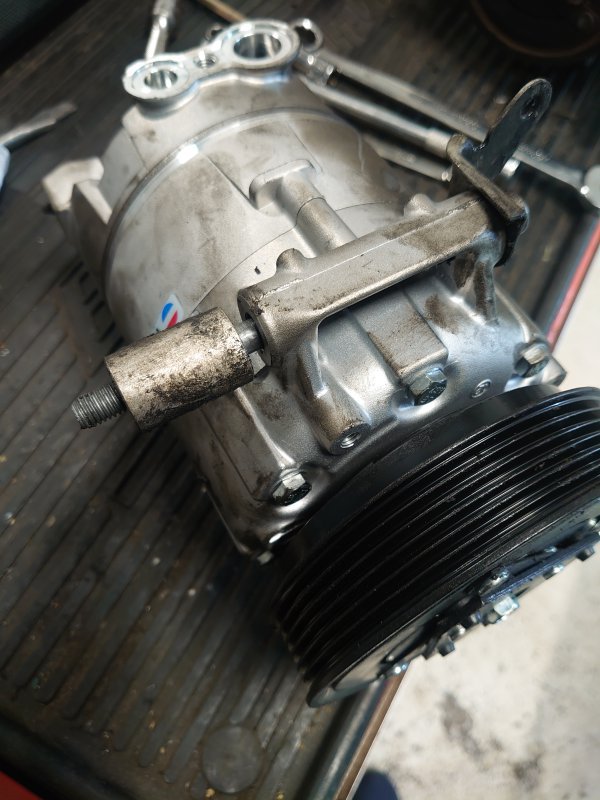
10: Remove top bolt then the bottom bolt. Be ready to catch the compressor! Caution: There is a spacer on the top bolt, between the compressor & block. I didn't know until I heard something drop!
You should now be about an hour in to the job with the compressor on the bench/floor.
Refit is the reversal of the above, mount the compressor loosely with the spacer on the top bolt. Once they are all run in a bit, tighten. Refit the pipes on the rear using new seals & tighten the connector using the small 6mm bolt. Secure the pipe back to the head & refit the belt. Fit the under tray & it's done.
If you have fitted a new compressor, just confirm it has some oil in it already, other wise add some oil when re gassing the system.
You should be about two hours in & the job is finished.
I've attached a couple of pictures, one of the pipe bolt & one of the spacer that I dropped. These are the only two things to watch out for, everything else was straight forward.
Good luck guys, I hope you find it as easy as I did?
Not bragging, not boasting but I managed to change the AC compressor in just over 2 hours this weekend.
The reason for this post? Simple, I looked up this job to see how bad my day was going to be & everything I read suggested an 8 hour, exhaust manifold removal job. As a result I booked myself the whole day to do it & was very happy when it was off the ramp a couple of hours later. As a result I wanted to share my experience with you all to give people in a similar situation the confidence to do it on their own. Quickly!
I did search for something similar but couldn't find anything, hence this post. If it already exists then please feel free to delete/move.
Tools required: Ratchet, 10mm socket, 10mm & 15mm spanner, 6mm hex socket, 5mm hex socket, 6mm hex bit, large phillips screw driver. Optional: Glue
Replacement compressor, new o rings
1: De-gass the system. I went to a friends garage who took out just under 500gms.
2: Raise car. I was lucky to have access to a ramp but it could be done on the floor.
3: Remove lower engine tray, 3x 10mm bolts at rear & two large phillips either side. Compressor is now right in front of you, very easy access.
4: 15mm spanner onto tensioner & pull the belt. Watch the direction of the spanner & push/pull accordingly to release tension on belt. Remove belt from AC & power steering pump. I left belt on the other pullies.
5: Using 6mm hex socket crack off lower & top bolts holding compressor to block
6: Remove pipes from rear of compressor. This is where I saw the reason people removed the manifold. It's quite close to the pipes & unable to get a normal socket & ratchet in to remove the bolt. So I used a 6mm hex bit, not a socket, just the actual bit on it's own. I then used the 10mm spanner to remove it. In hindsight, I would have put some glue on it to stay in place as it fell out twice. Not superglue, just some basic bonding agent to help keep it in place.
7: If you follow the ac pipe up from the compressor you'll see a 5mm bolt holding it to the head. Remove the bolt.
8: Remove both pipes from the rear of the compressor. Catch the o rings.
9: With the pipes out of the way you'll see the rear mounting 6mm bolt. Remove.
10: Remove top bolt then the bottom bolt. Be ready to catch the compressor! Caution: There is a spacer on the top bolt, between the compressor & block. I didn't know until I heard something drop!
You should now be about an hour in to the job with the compressor on the bench/floor.
Refit is the reversal of the above, mount the compressor loosely with the spacer on the top bolt. Once they are all run in a bit, tighten. Refit the pipes on the rear using new seals & tighten the connector using the small 6mm bolt. Secure the pipe back to the head & refit the belt. Fit the under tray & it's done.
If you have fitted a new compressor, just confirm it has some oil in it already, other wise add some oil when re gassing the system.
You should be about two hours in & the job is finished.
I've attached a couple of pictures, one of the pipe bolt & one of the spacer that I dropped. These are the only two things to watch out for, everything else was straight forward.
Good luck guys, I hope you find it as easy as I did?