Sticky buttons sorted today

tonycharente

Member
Messages
182
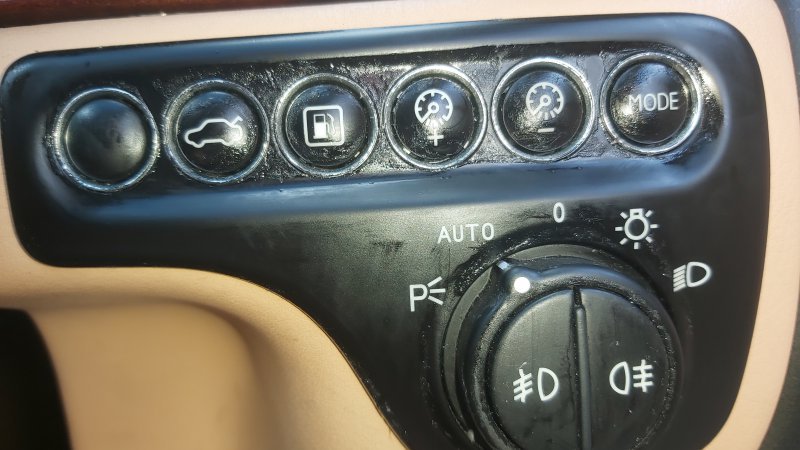
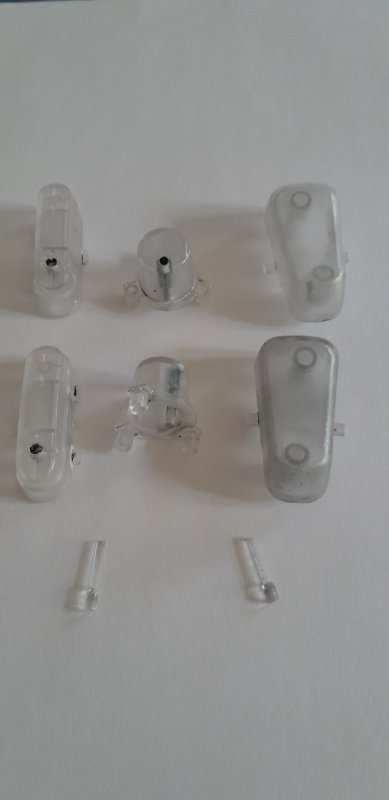
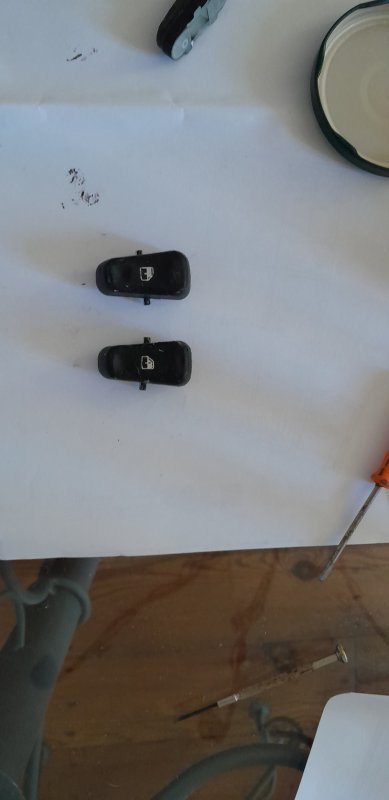
Just to let you know a bit more detail on these (not wishing to patronise, just clarify:)). The little round piece you can press out that Nibby is referring to is the indicator light, which shines when the button is switched on.
All the buttons including the nav buttons etc, have backlighting which comes on when the sidelights are on, so you can find them in the dark.
I designed the stickers to account for that by following the below, very fiddly process.

1. Strip buttons back to the white coating. (Or like I accidently did, strip the white as well and need to re-paint the white)
2. Carefully use a scalpel to cut out the required sticker leaving a decent black border around the icon.
3. Peel off the backing of the sticker and attach to the white button using the just visible original marking for lining up.
4. Carefully cut and attach a piece of masking tape that just covers the icon but not the whole sticker.
5. Spray the buttons a couple of coats of satin black. Not too many otherwise you will have a thick edge of paint build up.
6. Remove the masking carefully, using tweezers advised.
7. Spray as many coats of matt laquer as you can be bothered to. The more coats, the more the paint and sticker edges blend.
8. Fit all the buttons back in place, once dry.

My button stickers arrived safely from Andy4200 today, and very nice they look too, thank you Andy.

I have a few questions for Andy before I attack the project, please:-

"1. Strip buttons back to the white coating. (Or like I accidently did, strip the white as well and need to re-paint the white)"
If I totally strip the buttons right back, are they not still white? If so, why would I need to repaint them white?

"5. Spray the buttons a couple of coats of satin black".
What make of satin black paint did you use, please?

"7. Spray as many coats of matt laquer as you can be bothered to."
What make of matter laquer did you use, please?

Many thanks,
Tony
 

Andy4200

Member
Messages
143
Hi Tony,
Glad they arrived safely.

To answer your questions:

1. I used Mr Muscle oven cleaner which stripped the black gunk and the black paint. If left for too long it also removed the white primer underneath which leaves the buttons a frosty/clear plastic underneath. If this happens I used a couple of coats of 'autotek' white plastic primer.

5 & 7. I used autotek spray paint for this as well, satin black followed by matt laquer.

I kept to the same make of paint to avoid any reaction issues. I don't know if you can get autotek in France but as long as you use automotive grade spray paints it should be OK.

Andy.
 

tonycharente

Member
Messages
182
Hello Andy
Many thanks for the detailed reply.
Why does it matter if the buttons go frosty/clear please? Don't we actually want light to be able to shine through them?
 

Andy4200

Member
Messages
143
2 reasons really. Firstly the light through the button would be too bright without the white. The white paint helps diffuse the light emitted. Secondly, the white plastic primer helps the black top coat adhere to the buttons.
 

tonycharente

Member
Messages
182
Thanks Andy for your rapid and full reply.
Autotek paints seem to be hard to come by in France, and since Brexit it has become outlandishly complicated and expensive to import anything from the UK like I used to do all the time.
I'll try to find a make that do all the paints I'll need so as to avoid any reaction issues as you suggested.
Thanks again,
Tony
 

montravia

Member
Messages
1,623
One wipe.
Propan2-ol
Otherwise known as
Iso-propanol
I'll tentatively try around the white legends
Probably active ingredients in makeup whipes including emollient
20230709_155919.jpg
 

Nibby

Member
Messages
2,089
Hi Tony,
Glad they arrived safely.

To answer your questions:

1. I used Mr Muscle oven cleaner which stripped the black gunk and the black paint. If left for too long it also removed the white primer underneath which leaves the buttons a frosty/clear plastic underneath. If this happens I used a couple of coats of 'autotek' white plastic primer.

5 & 7. I used autotek spray paint for this as well, satin black followed by matt laquer.

I kept to the same make of paint to avoid any reaction issues. I don't know if you can get autotek in France but as long as you use automotive grade spray paints it should be OK.

Andy.
Just to add it was a pleasure not to get a load of tackiness when I pressed the air con buttons on Friday.
Why didn’t Maserati just keep it simple??
 

montravia

Member
Messages
1,623
Not bad for 10 minutes work with a rough cloth.
You can see the original state by the buttons, fuel filler cap button only had a light wipe.
Gentle attention with an artist brush to follow
Encouraged.
 

Attachments

  • 20230709_161029.jpg
    20230709_161029.jpg
    71.5 KB · Views: 58

tonycharente

Member
Messages
182
Update and a fresh question.

I managed to follow the video and Stickynomore tutorial and extract my buttons (just nine in my case : the two aircon buttons (recycle and econ) and the seven on the accessories panel.

I then soaked them overnight in 99.9% isopropanol in the hope it would dissolve the black sticky goo. This proved to be optimistic, but it did make it easy to wipe off the black sticky goo with kitchen towels soaked in isopropanol. I also removed all the white paint as I was worried the soaking in isopropanol would have weakened it - it also would have been very hard to achieve. Having removed all the white paint I was then left with no logos - I think they must be etched into the white paint.

I am attaching a photo showing two of each type of button plus a pair of the see through “pins” that you must remove before painting the set of five buttons so that the light can show through when the button has been pushed. Do note that the window buttons are handed (their pivot pins are not symmetric) - see my second photo.

And now my question… The two aircon buttons (recycle and econ) also have see through “pins” that you must remove before painting, but unlike on the set of five buttons the “pins” don’t seem to just push through easily. They clearly must be removed before these two buttons are painted – but how? Do they in fact push through, and if so in which direction?

Thanks to all for your help.

Tony
 

Attachments

  • Maserati buttons back to clear.jpg
    Maserati buttons back to clear.jpg
    20.2 KB · Views: 45
  • Maserati window buttons are handed.jpg
    Maserati window buttons are handed.jpg
    25.5 KB · Views: 42

tonycharente

Member
Messages
182
HELP PLEASE...
I'm getting on fine with the seven non-aircon buttons - sprayed with white primer, checked that light still shines through, attached several of the little stickers and poised to spray the buttons with satin black.

However I'll then be stuck if I don't get an answer to my question:-

The two aircon buttons (recycle and econ) also have see through “pins” that you must remove before painting, but unlike on the set of five buttons the “pins” don’t seem to just push through easily. They clearly must be removed before these two buttons are painted – but how? Do they in fact push through, and if so in which direction?

I've tried pushing the "pins" in both directions and also tried twisting them to try to free their movement, all to no avail.


Thanks to all for your help.

Tony
 

Andy4200

Member
Messages
143
Hi Tony,
Sorry missed this. Yes those 2 were very difficult to get out. I can't honestly remember if/how I managed it or not. You may have to carefully mask the top of the pin before painting.
Andy.
 

tonycharente

Member
Messages
182
Update and new problems.
I managed to carefully mask the top of the pins before painting of the two aircon buttons - not wonderful but they don't look too bad.
Then I discovered that I hadn't noticed that the 5 buttons on the accessories panel have a way round to be able to fit them - they have one little projection on one side and two on the other side. Faced with needing to redo some of the buttons I decided I would simply turn them upside down. Not really a problem for the upper 3 buttons, but not so good for the MSP and SPORT buttons...
However I then had a fresh problem that I have yet to resolve. When I clipped back on the panel that holds all the switches in place, it pushed down on most of the 5 buttons, effectively forcing them down into the "on" position all the time. I have tried swapping round the buttons umpteen times, to no avail. I tried plugging the panel (and also the aircon panel) back into the car, but none of the buttons would work. In fact that may (or may not) have caused a whole new problem - see:-


All thoughts and help very welcome, please. What am I doing wrong when I clip back on the panel that holds all the switches in place?
 
Last edited:

Nibby

Member
Messages
2,089
Looks really tidy, it's on my 'to do' list, but does using the paint and stickers block the light from shining through the graphics?
Just an observation and I might be wrong but my sticky buttons took a turn for the worse when my heating matrix started leaking, wonder if the the antifreeze in the air round that area made them worse?
 

Soenvious

Member
Messages
129
Just an observation and I might be wrong but my sticky buttons took a turn for the worse when my heating matrix started leaking, wonder if the the antifreeze in the air round that area made them worse?
That's an interesting thought. Whilst doing my leaky heater matrix I noticed all the foam wrap around the console wiring harnesses, for the radio/display etc., had gone really gooey, like the buttons. I spent hours stripping sticky soggy foam wrap off the harnesses and re-wrapping with fabric tape.
 

Nibby

Member
Messages
2,089
That's an interesting thought. Whilst doing my leaky heater matrix I noticed all the foam wrap around the console wiring harnesses, for the radio/display etc., had gone really gooey, like the buttons. I spent hours stripping sticky soggy foam wrap off the harnesses and re-wrapping with fabric tape.
Seems likely the antifreeze is accelerating the stickiness on anything that was prone to it.
Up until this year my buttons looked quite respectable, things like ‘Sport’ button I never touch but still looked awful.
 

tonycharente

Member
Messages
182
Update and new problems.
I managed to carefully mask the top of the pins before painting of the two aircon buttons - not wonderful but they don't look too bad.
Then I discovered that I hadn't noticed that the 5 buttons on the accessories panel have a way round to be able to fit them - they have one little projection on one side and two on the other side. Faced with needing to redo some of the buttons I decided I would simply turn them upside down. Not really a problem for the upper 3 buttons, but not so good for the MSP and SPORT buttons...
However I then had a fresh problem that I have yet to resolve. When I clipped back on the panel that holds all the switches in place, it pushed down on most of the 5 buttons, effectively forcing them down into the "on" position all the time. I have tried swapping round the buttons umpteen times, to no avail. I tried plugging the panel (and also the aircon panel) back into the car, but none of the buttons would work. In fact that may (or may not) have caused a whole new problem - see:-


All thoughts and help very welcome, please. What am I doing wrong when I clip back on the panel that holds all the switches in place?
Update : cause of my problem found, but it means I have to start all over again with my 5 buttons.
I got to the bottom of why when I clipped on the panel it was pushing down on the buttons making most of them the equivalent of being pushed all the time.
I had, wrongly alas, thought that all 5 buttons were exactly the same. However I noticed that the plastic blocks that the buttons push on were not all the same lengths, and that indeed some of them tapered down slightly. This led me to measure the exact depth of the holes in the underside of the buttons, and found those to be different too. Long story short, by placing the buttons onto plastic blocks that the buttons push on according to their respective sizes I was then able to clip the panel on and have all the buttons work just fine. I reconnected the panel in the car to test it and everything worked perfectly.
However, all the above means that I now have all the buttons in the wrong place. I shall therefore have to entirely redo all of my five buttons - strip off the 6 layers of matt varnish, the 2 layers of satin black and the white undercoat, and start over from the very beginning. " O, woe is me" to put it mildly.

Note that I caused this problem because I stripped all of the original white primer leaving no trace of the original icons. Those that manage(d) to leave enough of the icon visible to be apply the appropriate icon sticker will not (have) suffer(ed) from this problem.

I'll let you know how I get on, but I'll be taking a break from doing this for a while.
Cheers
Tony
 

Andy4200

Member
Messages
143
Hi Tony,
Sorry to hear of your issues you've had. When I print another batch of stickers I'll do extra and send you some new ones, for when you feel ready to tackle it again.

I think I must have noticed the subtle difference in profiles and just left them in an organised order. Sorry that doesn't help you. I'll amend my previous instructions to include this warning.

All the best,
Andy.
 

tonycharente

Member
Messages
182
Hi Tony,
Sorry to hear of your issues you've had. When I print another batch of stickers I'll do extra and send you some new ones, for when you feel ready to tackle it again.

I think I must have noticed the subtle difference in profiles and just left them in an organised order. Sorry that doesn't help you. I'll amend my previous instructions to include this warning.

All the best,
Andy.
Many thanks Andy.
I originally bought two sets of stickers and although I ruined one of them it was not one of these five. So I should be OK unless I ruin another one.
Cheers
Tony